Using a DMARC record
What is DMARC and how is a DMARC record used?
What is DMARC?
DMARC (Domain-based Message Authentication, Reporting and Conformance) acts as a check on the effectiveness of SPF (Sender Policy Framework) and DKIM (Domain Keys Identified Mail). These two methods are used to verify the credibility and reliability of e-mails.
With DMARC, using SPF and DKIM, the main goal is to respond to e-mail spoofing - that is, to detect and prevent it - before it happens. Thus, it should lead to the containment of phishing, spam and spoofing. However, the entire protection mechanism of DMARC can only be effective if the receiving mail server also uses DMARC, performs the necessary checks and generates the DMARC reports. The most popular mail providers such as Google, Microsoft, web.de, GMX and Yahoo use DMARC, which is why you regularly receive reports from these mail servers.
DMARC is built on top of SPF and DKIM and therefore can only be used if at least one of the two methods is set up beforehand. DMARC allows you, as the sender, to indicate that your mail is protected with SPF and/or DKIM. In doing so, you can use a DMARC policy to specify how the receiving mail server should handle mail that fails the SPF and DKIM checks.
In addition, DMARC performs a "domain comparison". This matches whether the domain of the email address in the From header matches the SPF verification and DKIM signature specifications. This happens as follows:
DMARC and SPF: With respect to SPF, DMARC checks whether the
Fromheader of the sent e-mail matches the domain stored in the SPF record.DMARC and DKIM: With respect to DKIM, DMARC checks the validity of the cryptographic signature. The procedure matches the domain with the sender domain specified in the
Fromheader.
If the match is complete, the verification is considered successful and the e-mail is delivered to the recipient's mailbox. Likewise, a partial match may also occur if, for example, SPF or DKIM is set up for a domain, but the mail to be checked was sent from a subdomain. In this case, you can specify whether a partial match is sufficient or should be rejected. If the domain match is unsuccessful or a partial match is not accepted, the mail is processed according to the specified policy as if the SPF or DKIM check had failed.
A DMARC policy specifies how the receiving mail server should process e-mail from your domain. To ensure that all legitimate e-mails are sent correctly, the policy can be set progressively stricter. The goal should be to publish your domain with the strictest policy "reject", so that people cannot send fraudulent e-mails from your domain.
You can choose between the following three DMARC policies:
None (monitoring policy): If "none" is set, emails will be accepted by the receiving mail server even if they do not pass. In this case, no further action is taken and unqualified emails are still delivered to the recipient's mailbox. As the domain owner, you will receive information about the sending of the e-mail in your DMARC report. By analyzing the DMARC reports, you can determine who is sending emails on your behalf and whether permissions exist for them. This is especially useful for initial verification that all legitimate mail sent is properly authenticated.
Quarantine: Emails that do not pass authentication are usually moved to the recipient's spam folder with the "quarantine" setting. As the domain owner, you will still receive information about this in the reports and can thus analyze them.
Reject: All emails not authenticated with DMARC are usually rejected. Thus, they do not end up in the recipient's mailbox. In most cases, you as the sender will receive an undeliverable message from the recipient. Before you set up the DMARC "reject" policy, you should ensure that all third parties who are allowed to send email on your behalf are also properly authenticated. If this is not the case, their emails will also be rejected. You should pay particular attention to CRM systems and newsletter services. After the "reject" policy is published, no one should be able to send a fraudulent email from your domain.
Using the DMARC procedure, additional reports can be requested from mail servers that receive e-mails from your domain. DMARC reports contain information about the SPF and DKIM checks that were performed, as well as the result of the domain match. This allows you to check whether there were any authentication problems when sending your e-mails, and conclusions can be drawn about misuse if necessary. This gives you insight and control over e-mails sent on behalf of your domain.
How do I use DMARC?
To enable DMARC for your domain, you need to create a DMARC record. This is a DNS record of type TXT, in which the DMARC policy to be applied is defined. In addition, you can also enter here whether all or only a percentage of emails are to be processed and to which e-mail addresses the reports are to be sent.
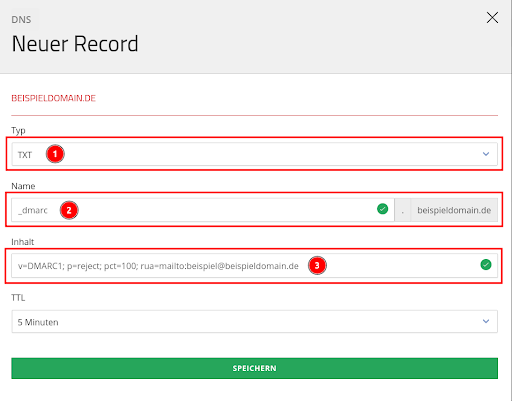
The DMARC record is created for your domain within DNS management as a TXT record (item 1) for the subdomain name _dmarc (item 2). Example:_dmarc.beispieldomain.de
Tags separated by semicolons are used for the content (point 3) of the DMARC record. Example:v=DMARC1; p=quarantine; pct=5; rua=mailto:beispiel@beispieldomain.de
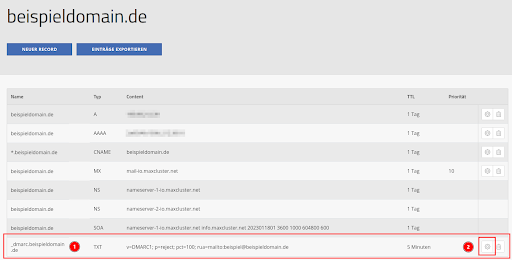
After you have created the DMARC record, it will be displayed within the DNS management (point 1). Here there is now also the possibility to edit the entry if you want to adjust the policy (point 2).
The following tags are most commonly used for a DMARC entry:
Required
Optional
Recommendation from maxcluster
Our recommendation is to use DMARC together with SPF and DKIM. You should already have SPF and DKIM set up in this case. Authentication procedures such as SPF, DKIM and DMARC together increase security and trust in the sender of business-critical e-mails.
We recommend adapting the use step by step:
Step 1
In the first step, only reports and data traffic are monitored. To approach the individual and optimal configuration and to determine the current ACTUAL state, you must first set the DMARC policy to p=none. With this setting, you will receive reports on the DMARC checks performed to the e-mail address specified in the policy.
Example DMARC record:v=DMARC1; p=none; rua=mailto:beispiel@beispieldomain.de

After this setting has been made, monitor your data traffic and check for irregularities in the reports. Look out for e-mails that have not yet been signed or where there could be forgery or misuse.
Step 2
If there are no more irregularities in the reports and you are satisfied with the results, the policy can be changed from none to quarantine. With this setting, you will receive reports of violations related to the e-mail address specified in the policy and the corresponding e-mails will be quarantined.
Example DMARC record:v=DMARC1; p=quarantine; rua=mailto:beispiel@beispieldomain.de

In addition to the required p-tag, the optional pct-tag can be used. This allows you to align and test your DMARC deployment. The default value is pct=100, which filters 100% of e-mails. This will be applied if you do not set a pct tag.
Start with a lower percentage first, for example 5%, and increase this by 5% increments at a time. If you set pct=5, the quarantine policy will apply to 5% of the e-mails. If these e-mails do not pass DMARC authentication, they will be sent to the recipients' spam folder. Your DMARC report will provide you with information on this, which you can then evaluate. The next lower policy is applied to the remaining 95 % of the e-mails, in this case none.
Expample DMARC record:v=DMARC1; p=quarantine; pct=5; rua=mailto:beispiel@beispieldomain.de

After you have made the change, you should continue to check the results. You can use the daily DMARC report for this. The target should be set to pct=100. This will send 100% of all e-mails not authenticated with DMARC to the recipients' spam folder. Once you have reached pct=100 with the quarantine policy and are satisfied with the results, then proceed to step three.
Step 3
When you are sure that only spoofed e-mails are rejected and that all e-mails legitimately sent on your behalf are signed, change the policy from quarantine to reject. Here the aim is to ensure that DMARC is fully exploited and that no one can send a fraudulent e-mail from your domain.
Again, in addition to the required p-tag, the optional pct-tag can be used (see step 2). This way you can continue to align and test your DMARC deployment. Again, start with a lower percentage and gradually increase it until the goal of 100% is reached.
Example DMARC record:v=DMARC1; p=reject; pct=30; rua=mailto:beispiel@beispieldomain.de

Further, you should now check your DMARC reports to ensure that the results are satisfactory to you. Your own mails should pass the check and be delivered, while fraudulent mails will be correctly rejected.
The goal sought with the DMARC policy is to achieve a p=reject policy at 100%. This will automatically reject all e-mails not authenticated with DMARC at 100%.
Once this point is reached, the pct tag can be taken out completely because pct=100 is the default setting if there is no pct tag in the DMARC record.
Example DMARC record:v=DMARC1; p=reject; rua=mailto:beispiel@beispieldomain.de

If you have any further questions, please contact our support team at +49 5251 414130 or by e-mail at support@maxcluster.de.