Installation guide for Akeneo
With this installation guide we will take you step by step through the installation of Akeneo on your cluster.
Table of contents
At maxcluster it is possible to host Akeneo in the Community Edition. We offer hosting of versions 4, 5 and 6.
For new customers, the system requirements are already installed or pre-installed when providing the web cluster.
Existing customers are advised to contact technical support via email or phone to verify that the system requirements are met. Technical support will be happy to help you quickly at beratung@maxcluster.de or by phone at +49 (0) 5251 4141-350.
System requirements
A list of the system requirements can be found here: https://maxcluster.de/en/knowledge-base/managedcenter/akeneo-pim-hosting-faq
Create domain
To run Akeneo on your maxcluster Web Cluster, you need a new domain. The following describes how to set up Akeneo for Apache.
Log into the Managed Center and follow the instructions on the screenshots to switch to the Apache section and create a new domain:
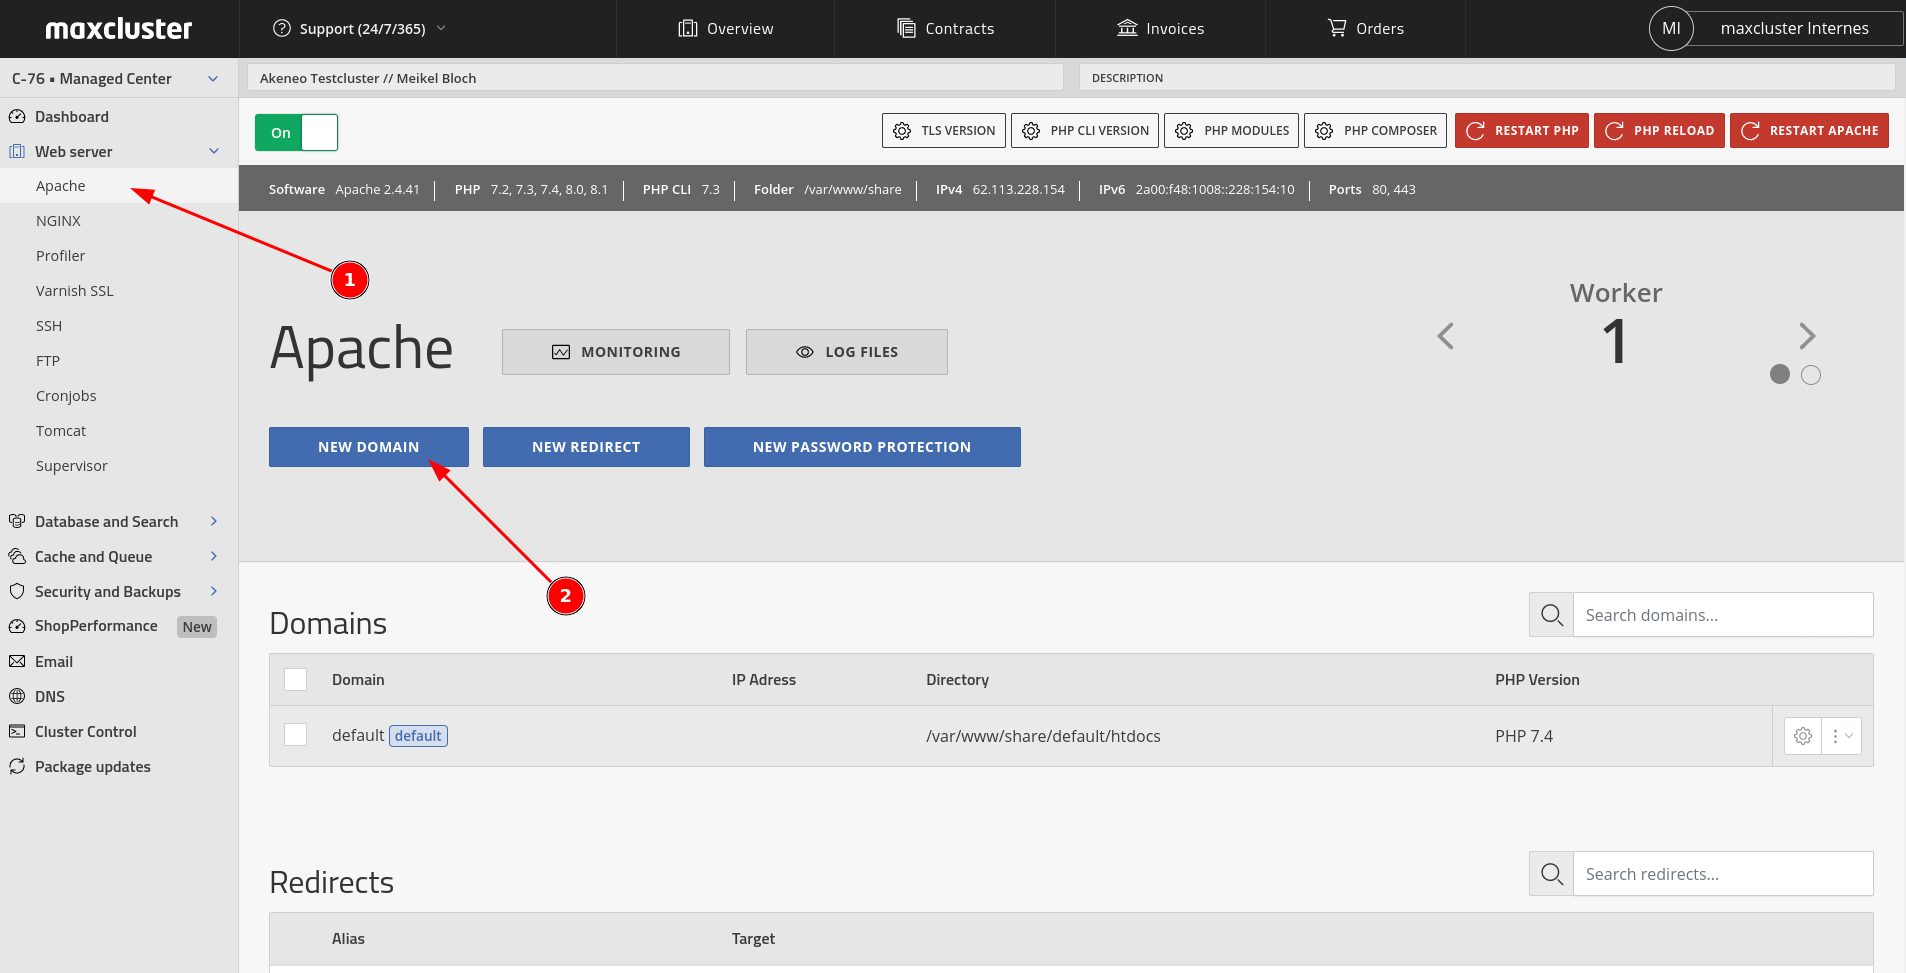
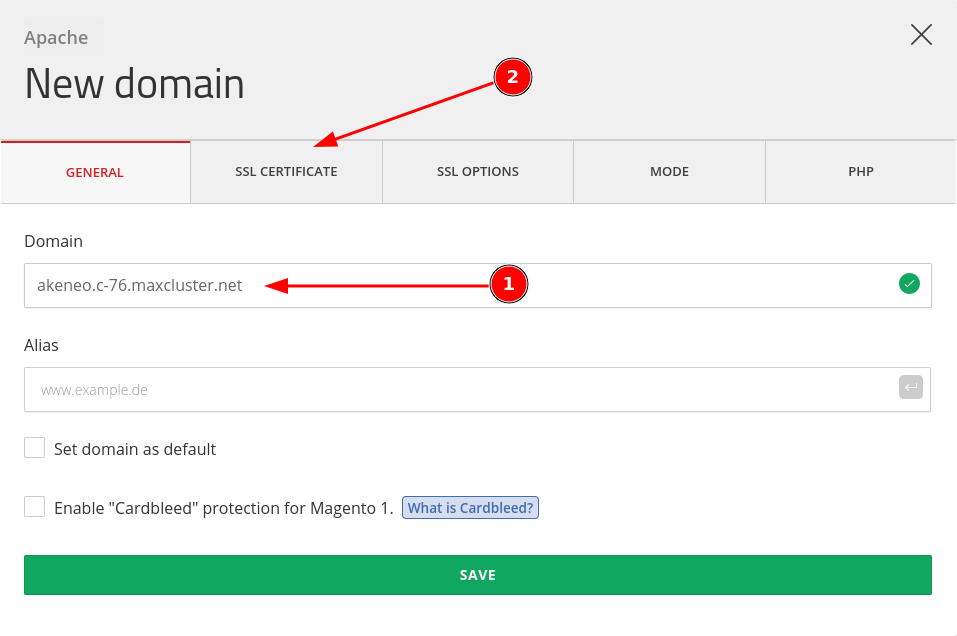
Enter the desired domain name in the "Domain" field. We use the name akeneo.c-76.maxcluster.net for this documentation in the screenshots. Whenever you see this domain name or the placeholder ${VHOST} in the rest of this tutorial, you should replace it with the domain name you chose in this step.
One thing to note is that you are using a new domain name here, as all files in the DocumentRoot of this domain will be deleted later in the installation.
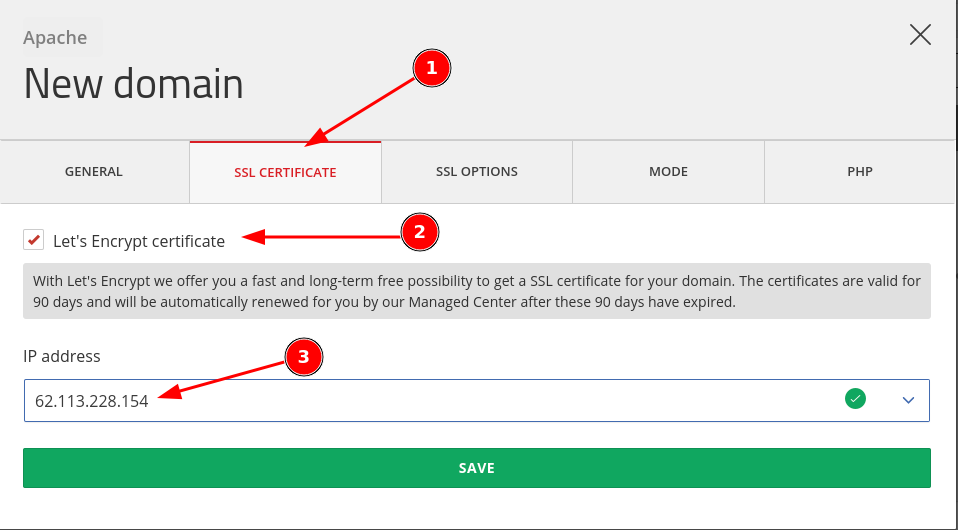
After that, switch to the "SSL Certificate" tab, check the "Let's Encrypt Certificate" box and select the IP address of the cluster from the pull-down menu. This is to set up a Let's Encrypt SSL certificate so that your website can be accessed using HTTPS:
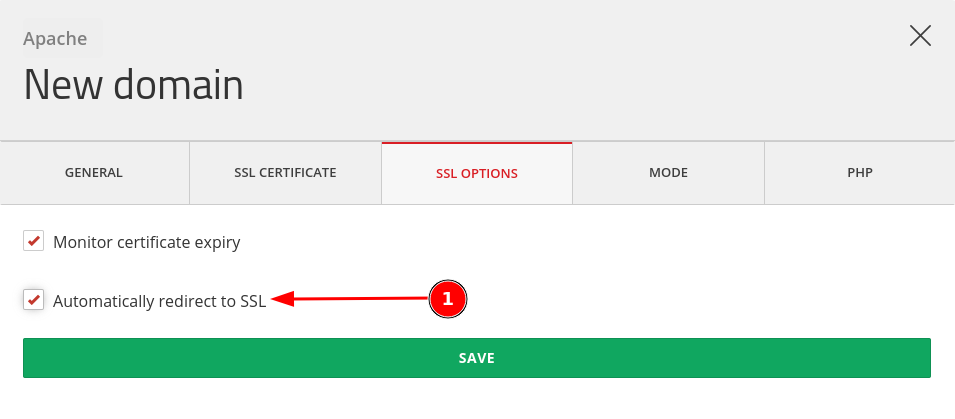
After that, switch to the "SSL options" tab. There you now activate the automatic redirection to SSL, so that your Akeneo installation can be called exclusively secured:
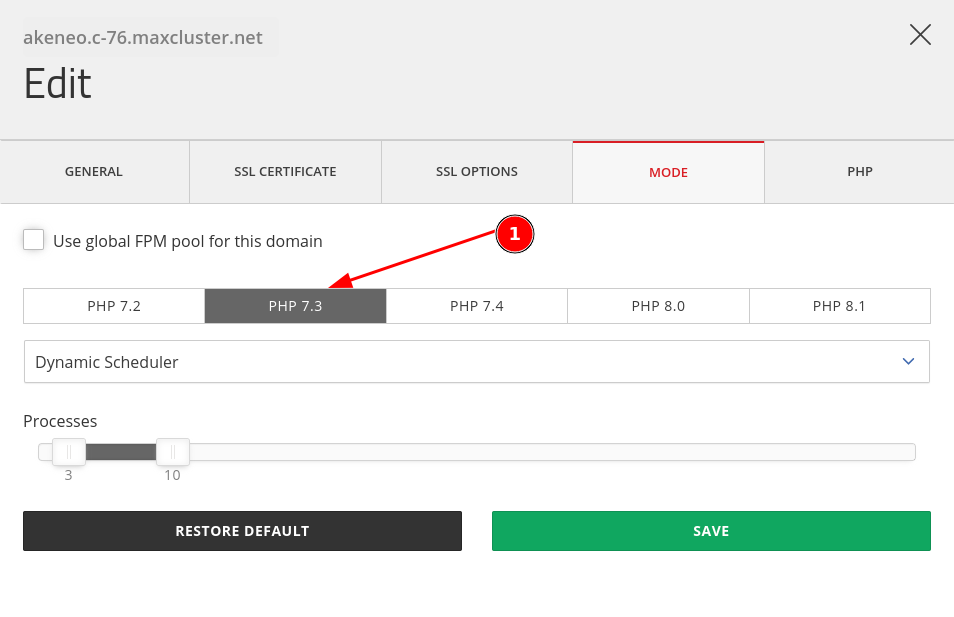
Set PHP version
Depending on the Akeneo version you are using, select the appropriate PHP version at the location shown in the screenshot. The correct PHP versions to the Akeneo version are:
- Akeneo 4: PHP 7.3
- Akeneo 5: PHP 7.4
- Akeneo 6: PHP 8.0
In this example, we use PHP 7.3 as the PHP version for Akeneo 4:
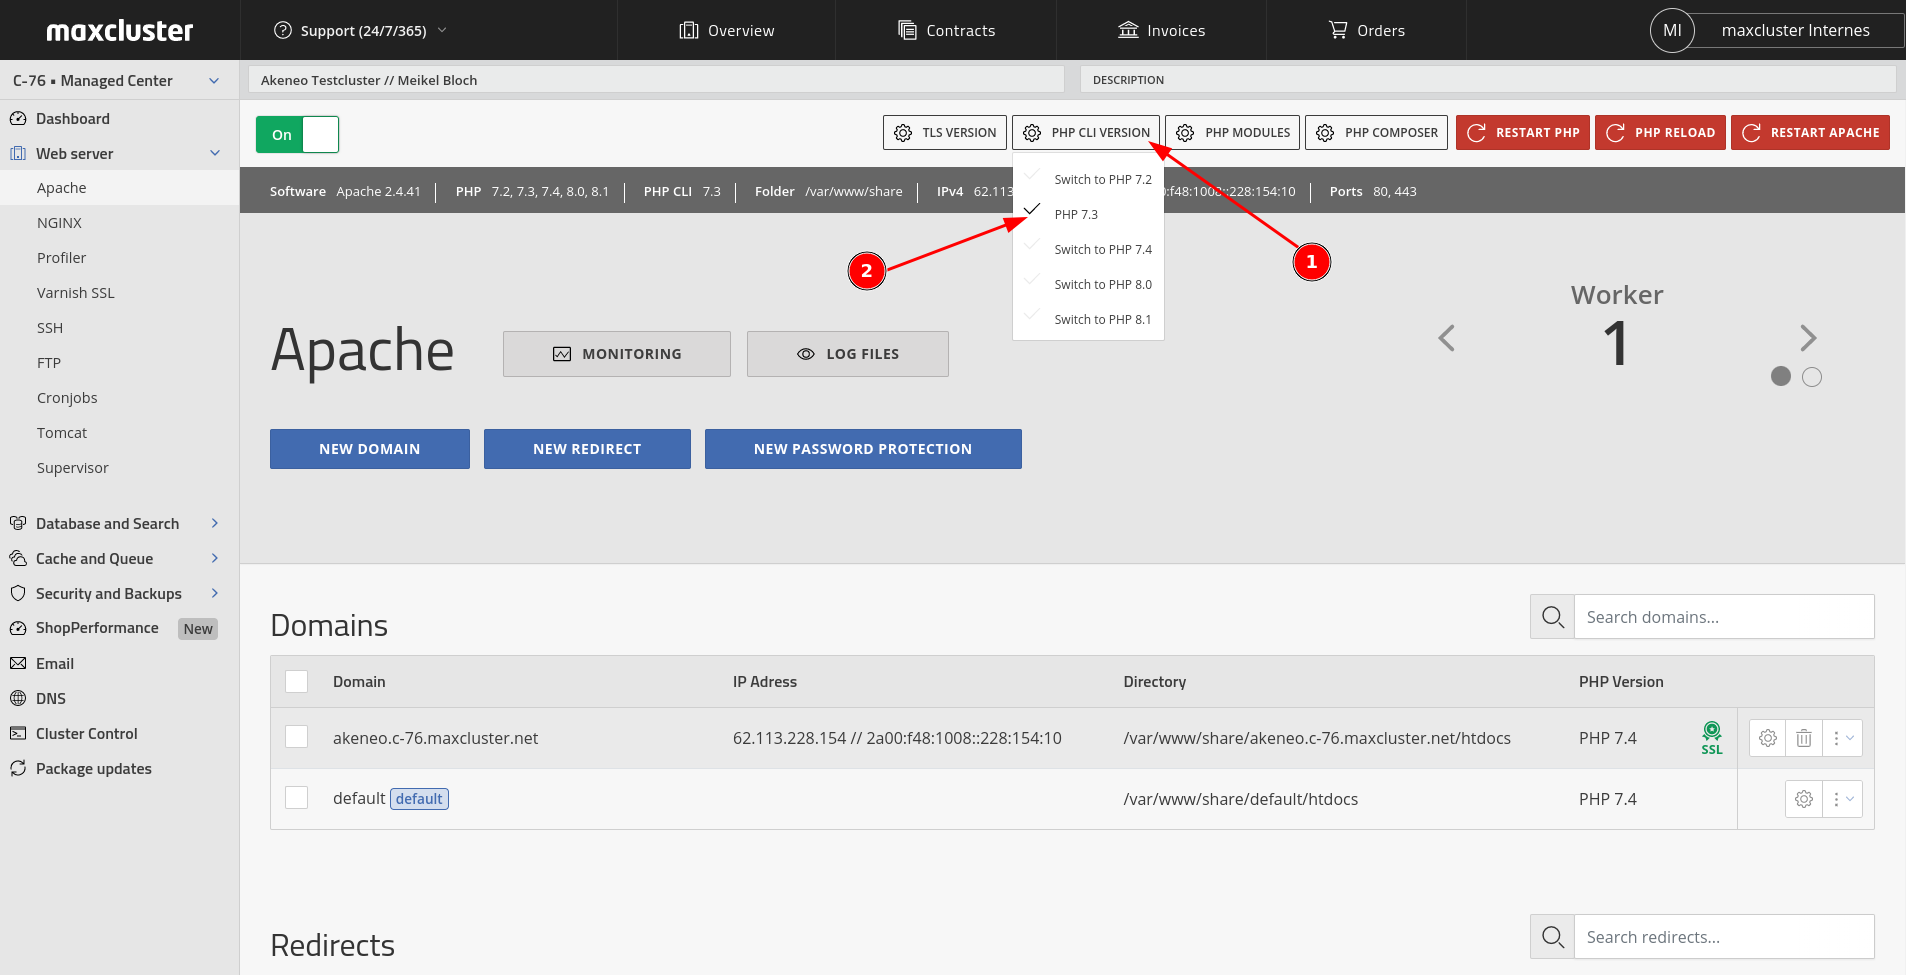
In order for the cronjobs to run error-free later, you still need to set the PHP CLI version that matches your Akeneo version. Choose the appropriate PHP version analogous to the screenshot:
- Akeneo 4: PHP 7.3
- Akeneo 5: PHP 7.4
- Akeneo 6: PHP 8.0
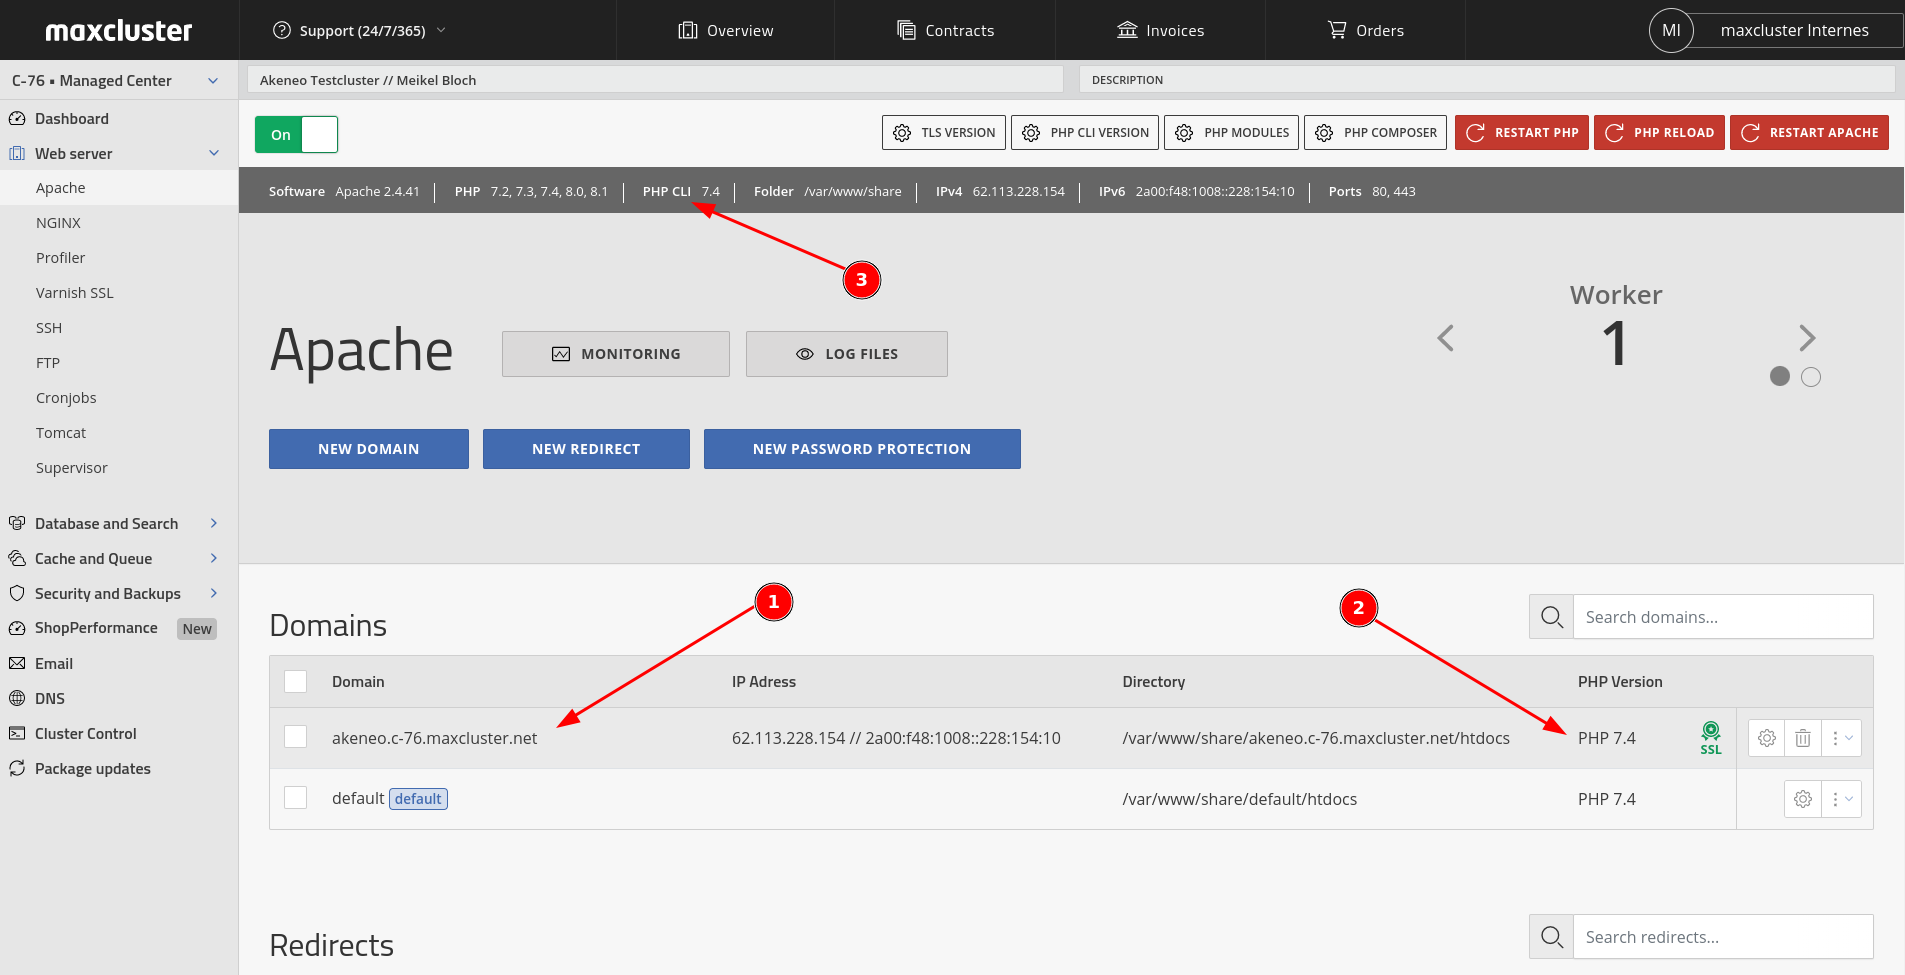
If everything is set correctly, the display in the Managed Center should look like this (in the places marked "2" and "3" you should see the PHP and PHP CLI version that matches the Akeneo version you have installed:
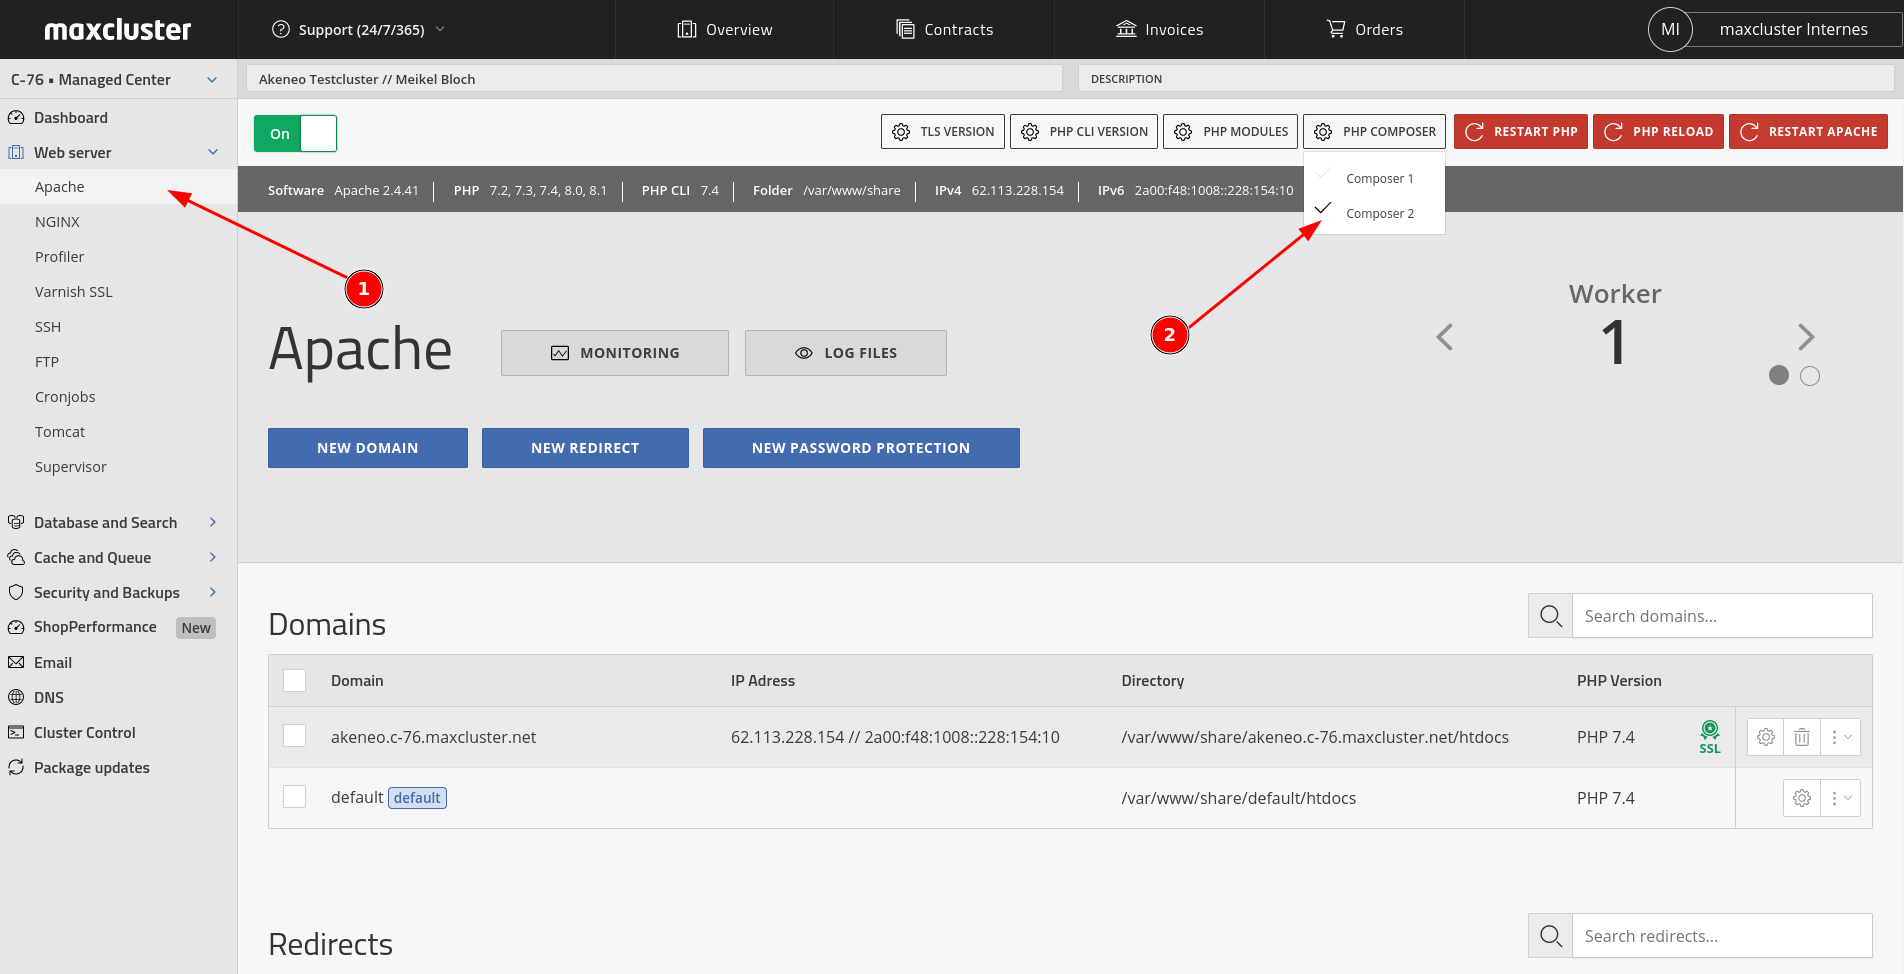
Set Composer version
Akeneo is loaded and installed via Composer. Accordingly, you still need to change the Composer version to Composer 2 as shown in the screenshot:
Create MySQL database
You can create the database before or after the MySQL upgrade to version 8. However, we recommend waiting until after the upgrade to do so.
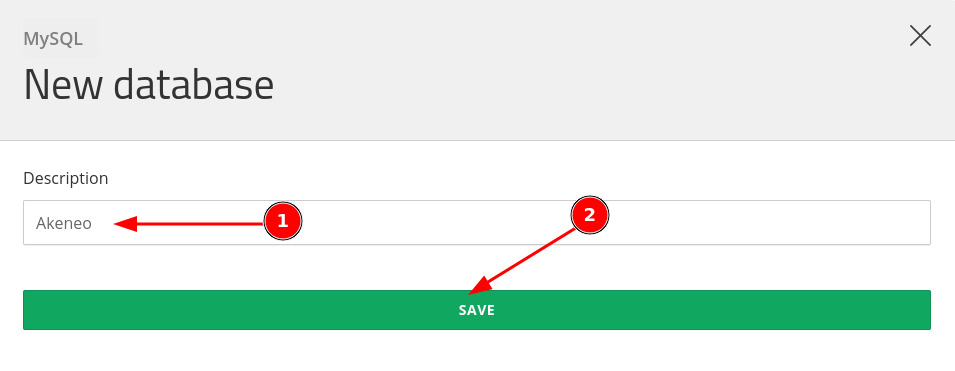
To do this, select one of the two "New Database" buttons and give the database a description text in the second step:
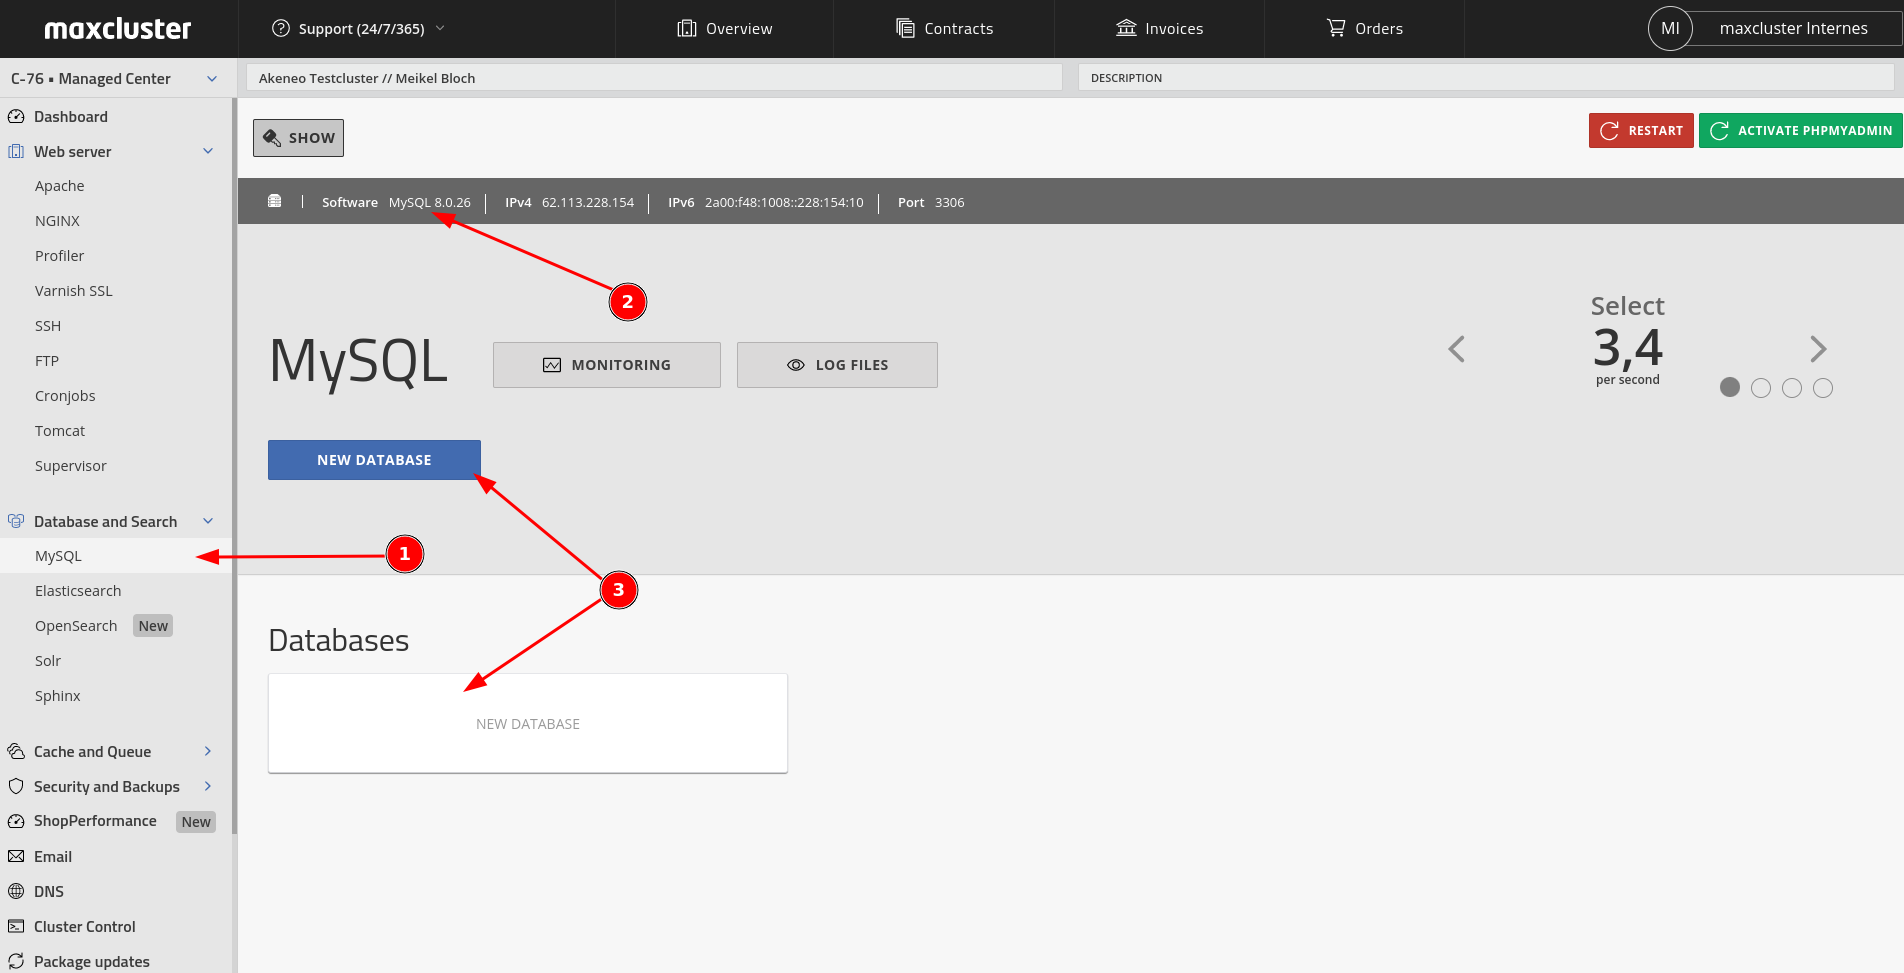
The description text will help you in the Managed Center overview to quickly and easily identify the affiliation.
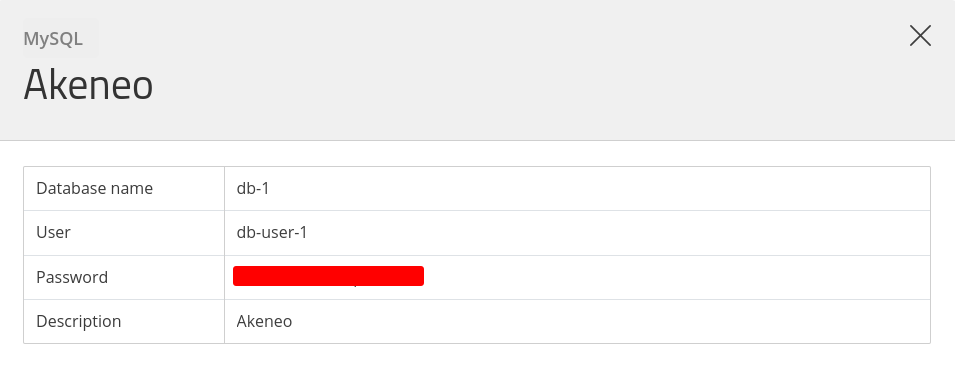
You will then be shown the database credentials. Please cache the database name, database user and database password, as you will need them later during Akeneo installation to create the configuration file:
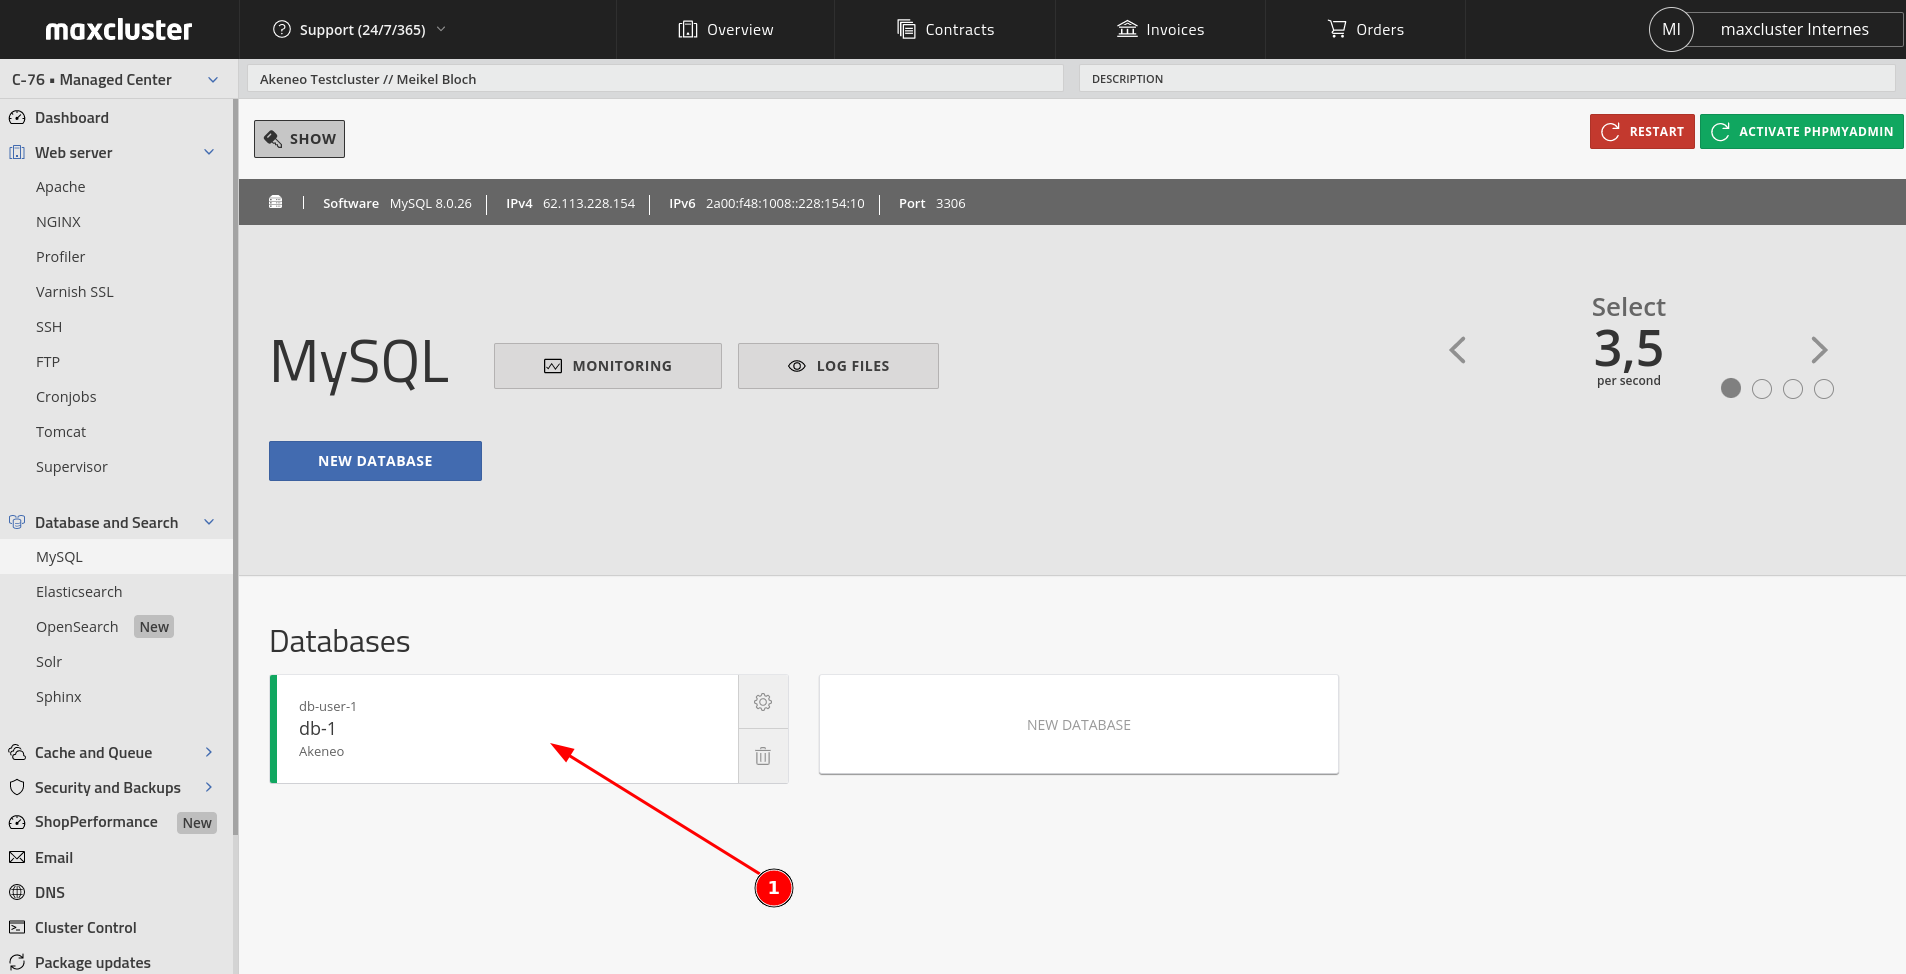
Once MySQL is set up correctly, this should look like the following in the Managed Center:
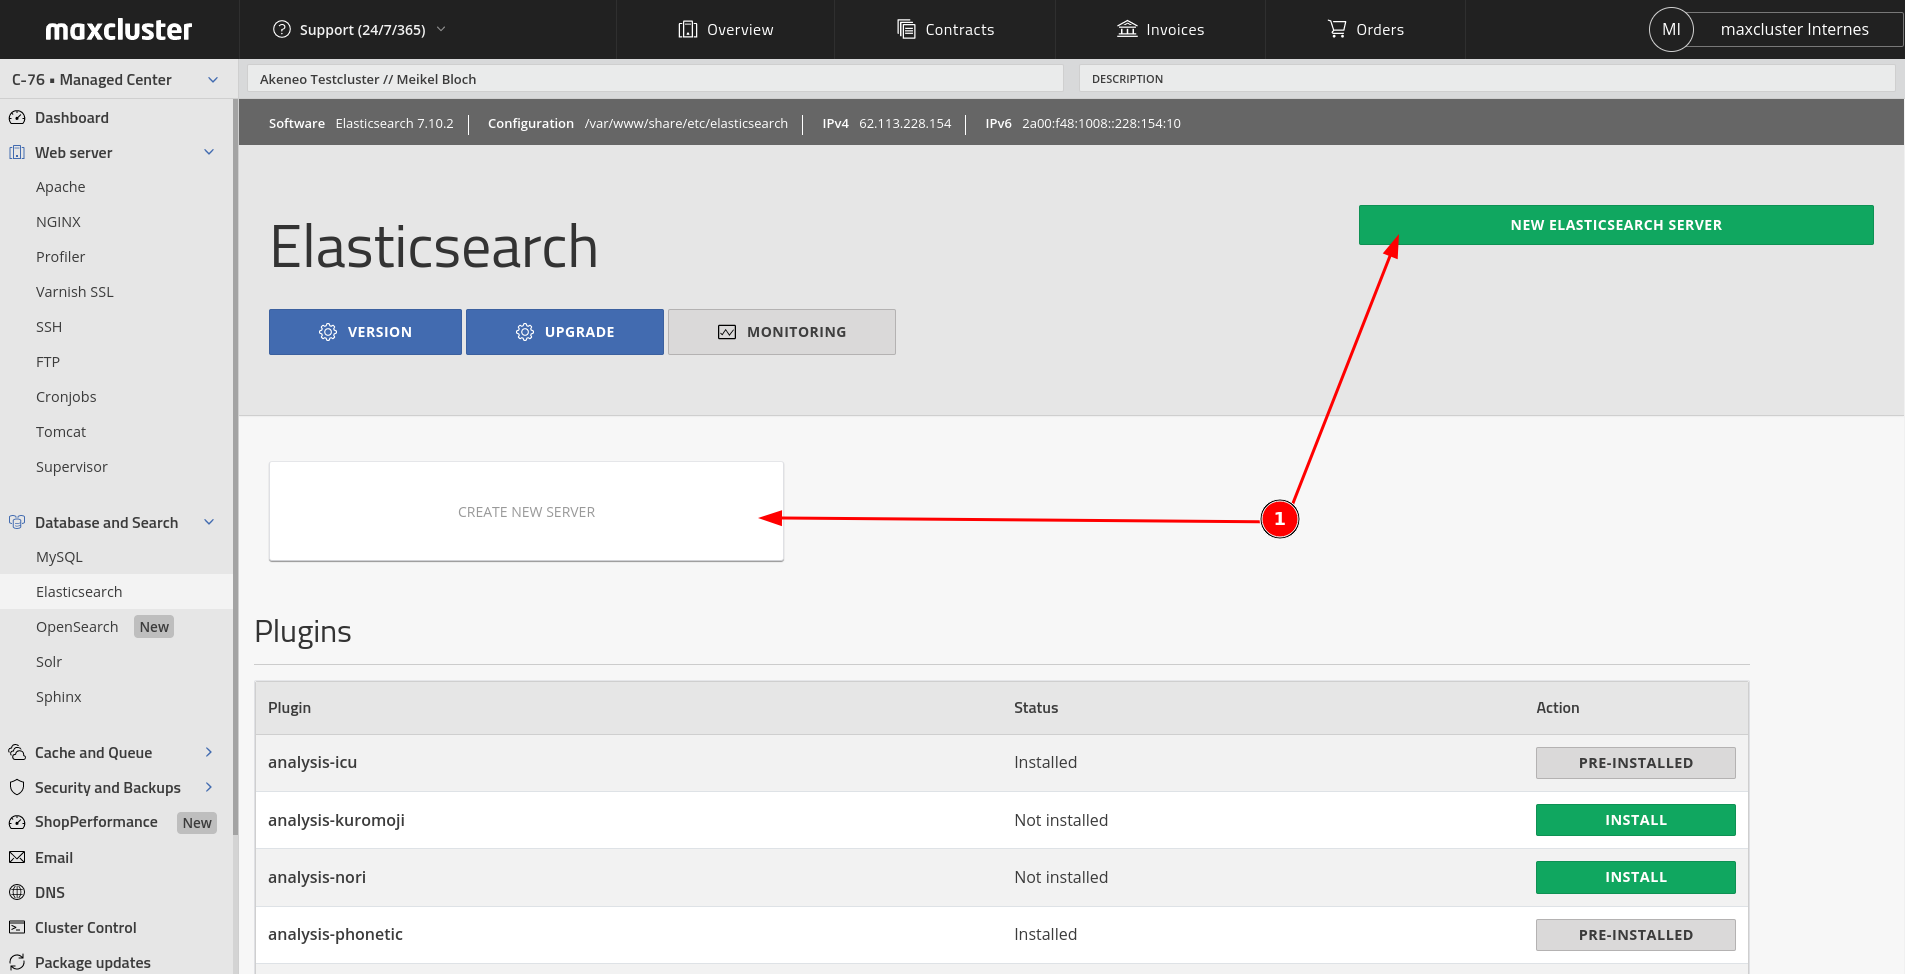
Elasticsearch/Opensearch installation.
Next, you need to install Elasticsearch and create an instance. Alternatively, you can also use OpenSearch.
The recommended versions are:
- Akeneo 4: Elasticsearch = 7.5
- Akeneo 5: Elasticsearch = 7.10
- Akeneo 6: OpenSearch >= 1.3
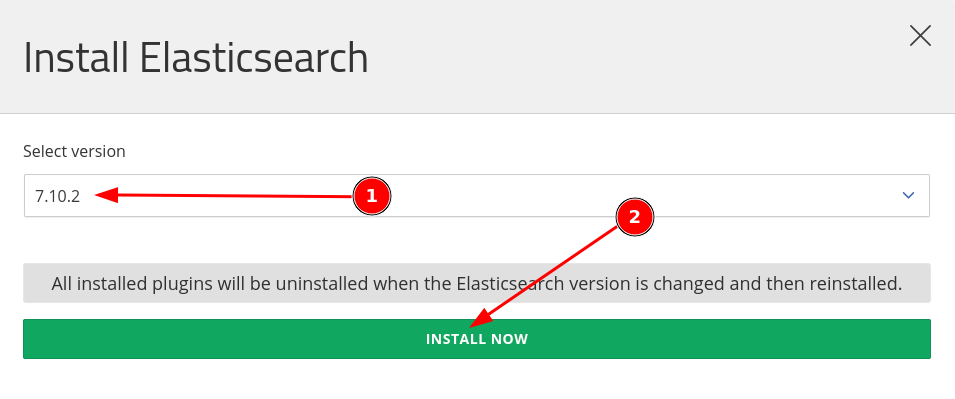
Install Elasticsearch

During the installation, you need to select the version you want to use and then start the installation:
Now you can create the Elasticsearch instance:
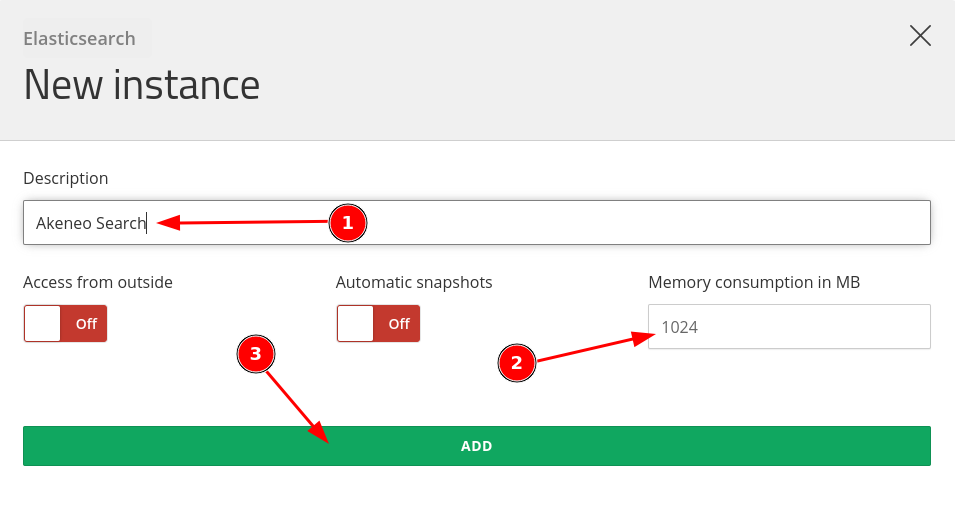
When creating, you need to make sure that you set a description and set a heap size. A heap size of 1024 MB is sufficient for installation and can always be increased for live operation:
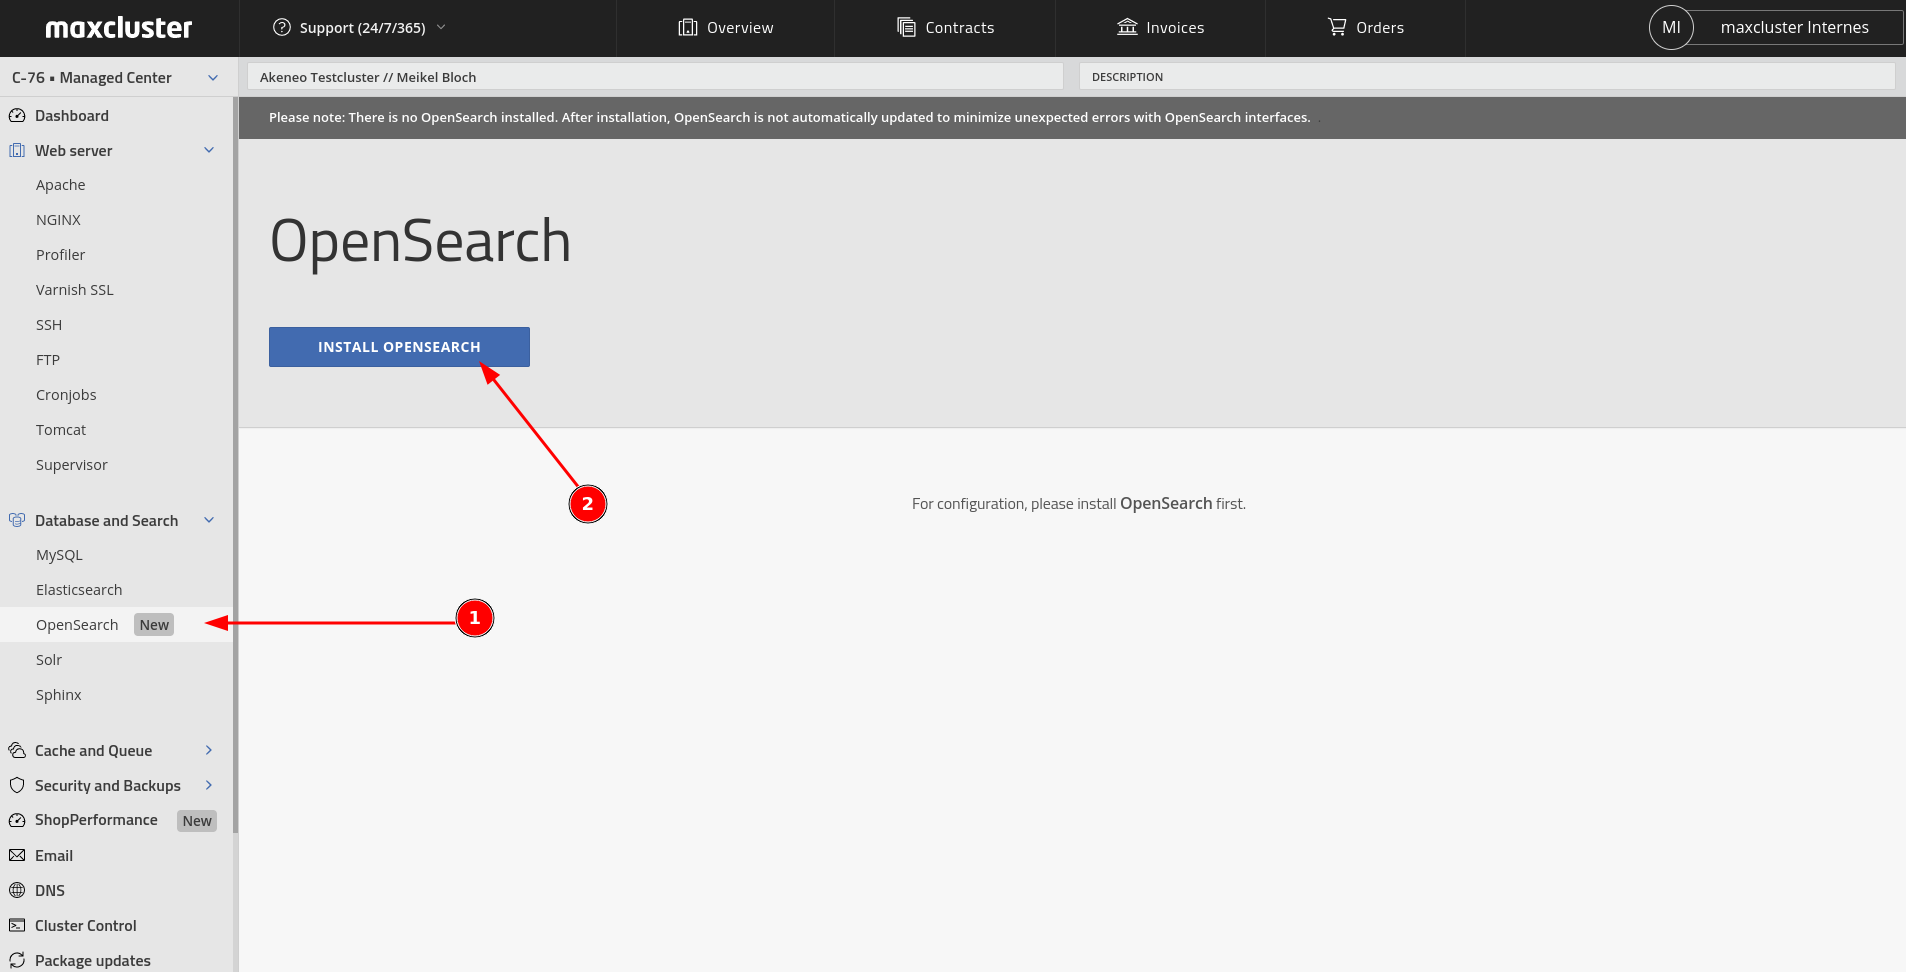
Install OpenSearch
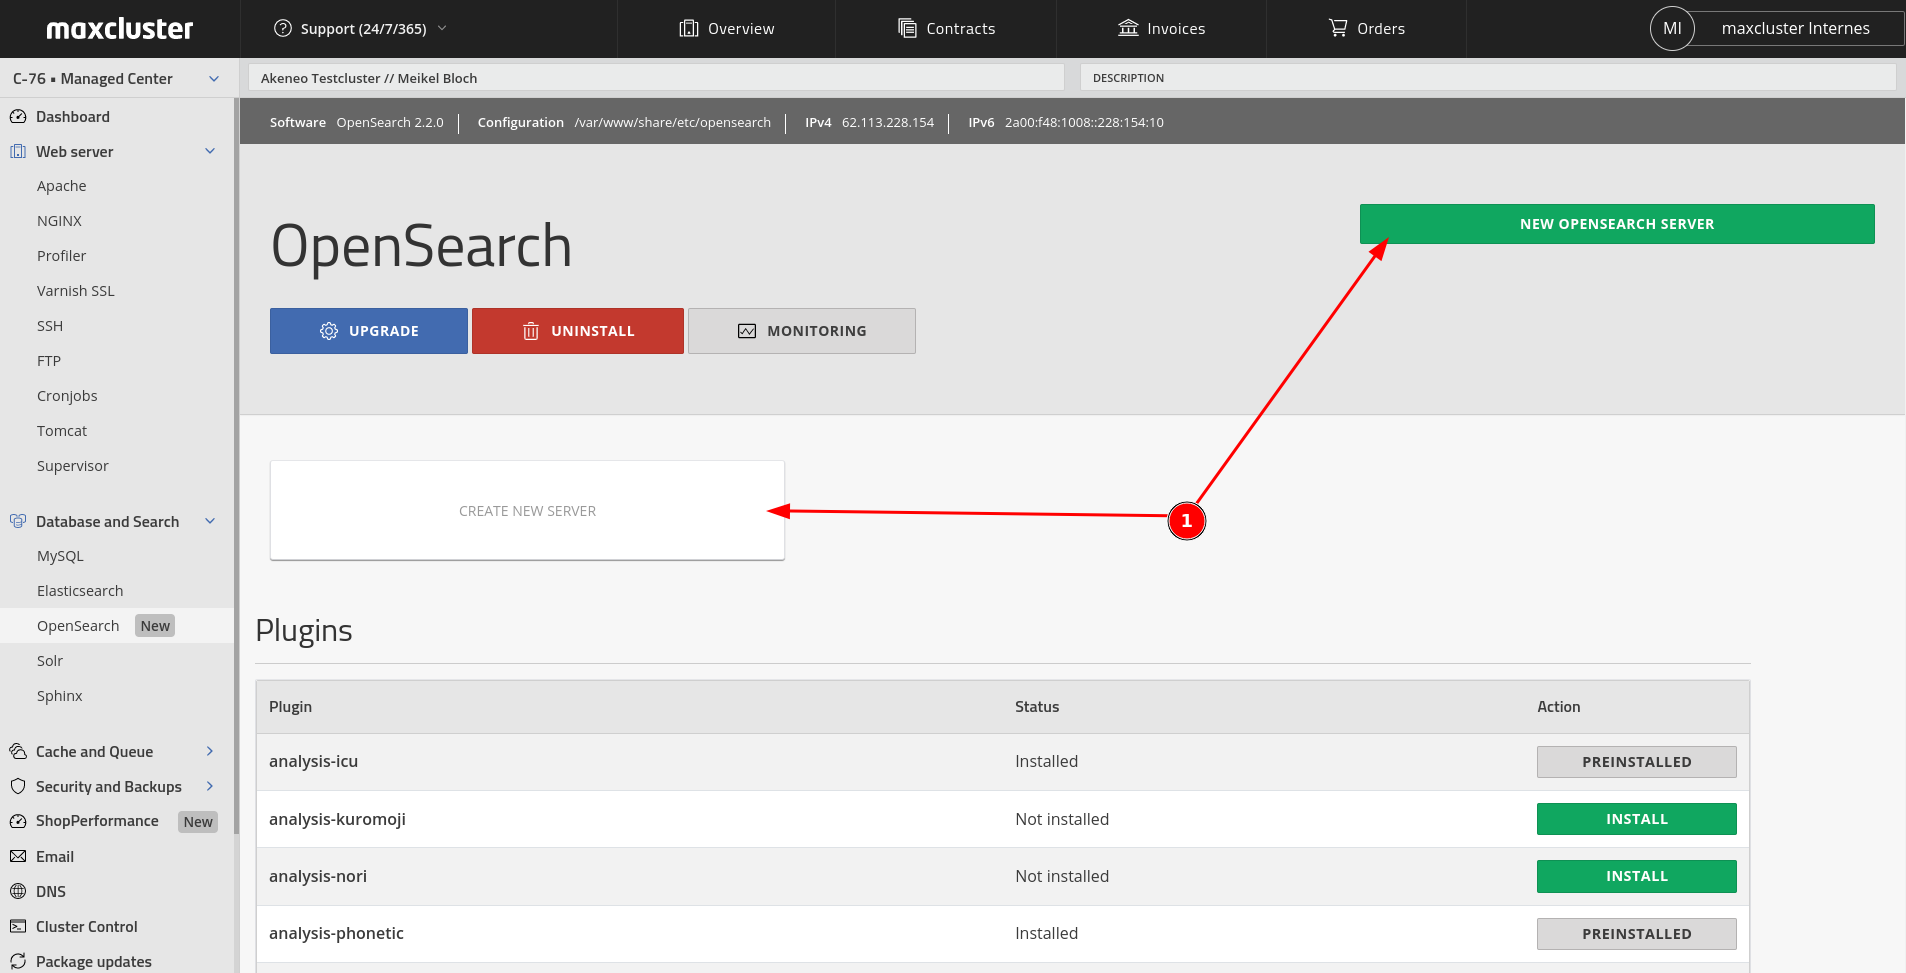
Open the "OpenSearch" section in the sidebar and select "Install OpenSearch":
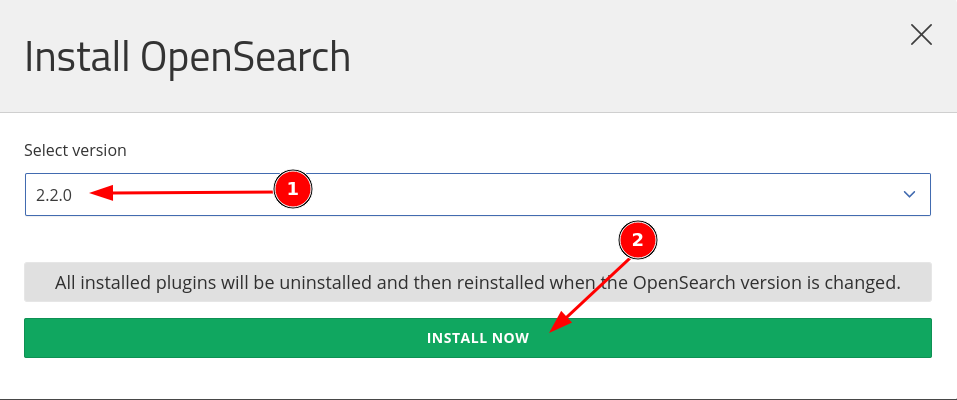
During the installation you need to select the version you want to use and then start the installation:
One of the two buttons gives you the option to create a new OpenSearch instance:
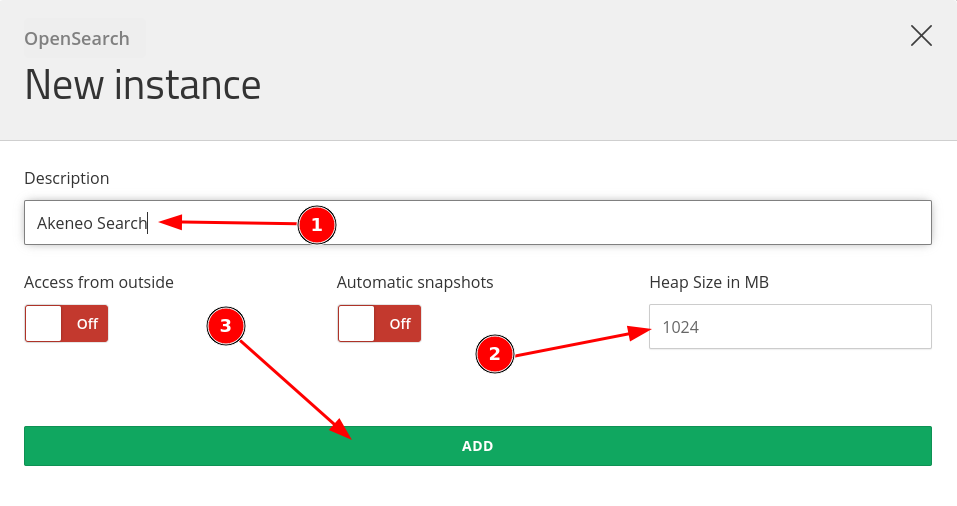
When you create it, you need to specify a description and set a heap size. A heap size of 1024 MB is sufficient for the installation and can be increased at any time for live operation:
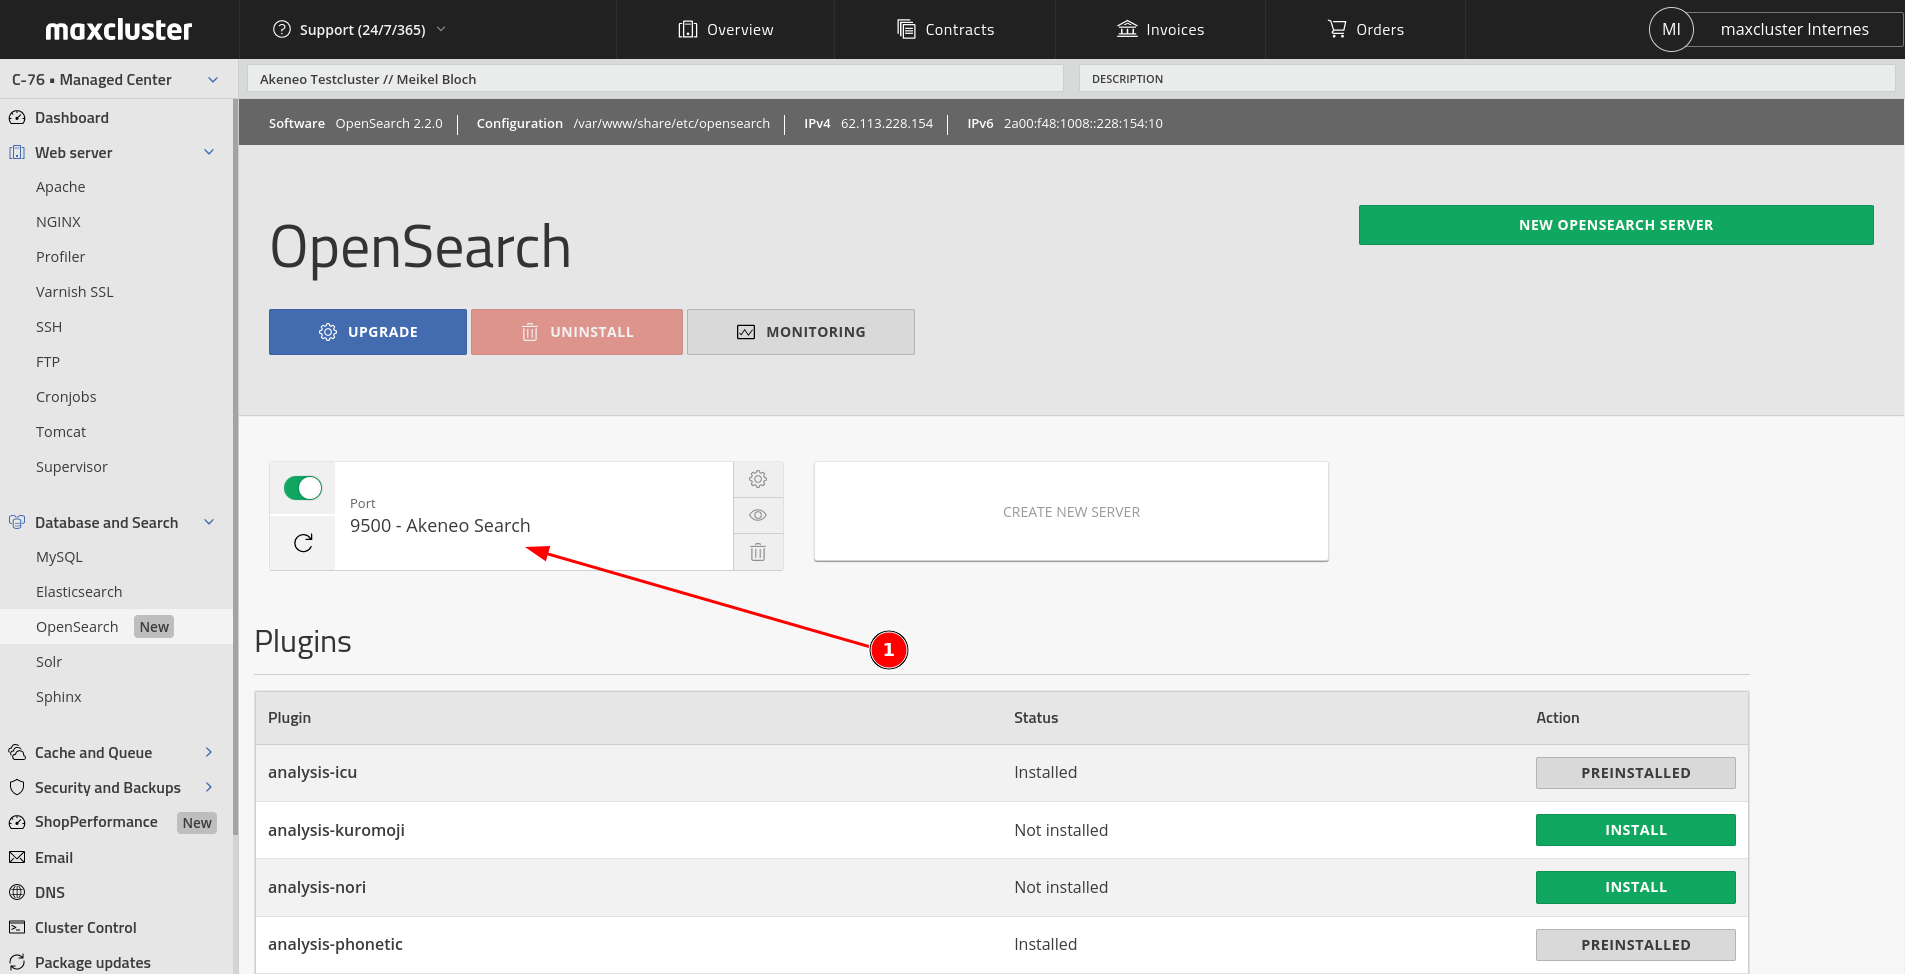
The completed Elasticsearch/OpenSearch server should look like the following in the Managed Center. Please note the port number here (OpenSearch with port 9500 in the example), as this will be needed later to configure the environment file.
Install supervisor
The preparations are now mostly complete. Now you just need to install Supervisor:
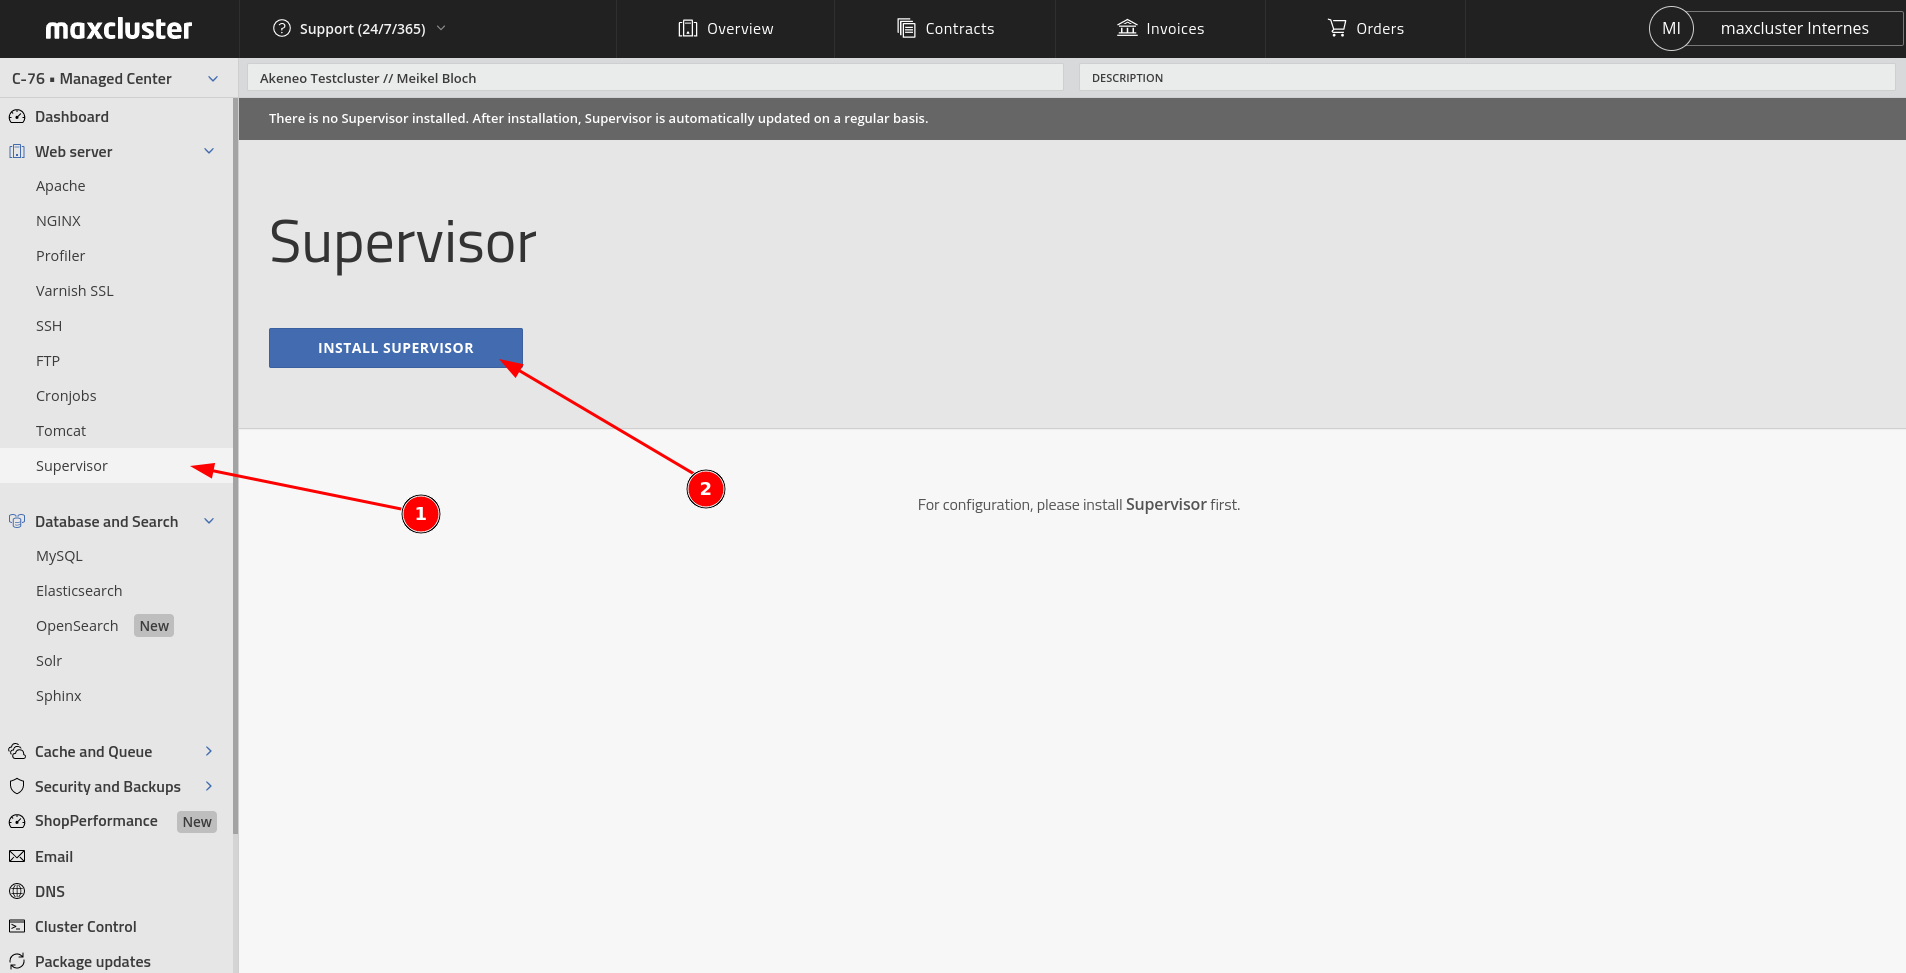
Once the installation is complete, you can move on to preparing the Document Root. You will set up the Supervisor program after Akeneo is installed. Accordingly, you will now need an SSH connection to the cluster.
Prepare DocumentRoot
Change the directory
First, navigate to the directory of the newly created domain. To do this, replace the folder name akeneo.c-76.maxcluster.net with your chosen domain name in the following line:
cd /var/www/share/akeneo.c-76.maxcluster.netRemoving the default DocumentRoot
After you arrive at the root of the domain, use the following command to delete the "htdocs" folder and its contents:
rm -r htdocsThis is needed because the public folder in the Akeneo directory will be the later DocumentRoot.
Create symlink for DocumentRoot
Now create a symlink called "htdocs" that points to the public folder in the akeneo directory:
ln -s akeneo/public htdocsThis ensures that the DocumentRoot of the domain inside the Akeneo directory is on the public directory provided by Akeneo.
Akeneo download
Now you can start downloading Akeneo.
Akeneo 4
For Akeneo 4 you need to run the following command:
composer2 create-project akeneo/pim-community-standard akeneo "4.0.*@stable"Akeneo 5
For Akeneo 5, you need to run the following command:
composer2 create-project akeneo/pim-community-standard akeneo "5.0.*@stable"Akeneo 6
For Akeneo 6, you need to run the following command:
composer2 create-project akeneo/pim-community-standard akeneo "6.0.*@stable"Create Secret
To install Akeneo, you need a secret that is at best 50 characters long. You can create it as follows:
pwgen 50 1You have to cache this newly created secret once, because you will need it in the next step.
Environment file
You will now create an .env.local file that sets the parameters for Akeneo:
nano akeneo/.env.localThere you enter the following content:
LOGGING_LEVEL=NOTICE
APP_DEBUG=0
APP_ENV=prod
APP_DATABASE_HOST=localhost
APP_DATABASE_PORT=3306
APP_DATABASE_NAME=db-NUMBER
APP_DATABASE_USER=db-user-NUMBER
APP_DATABASE_PASSWORD='PASSWORD'
APP_INDEX_HOSTS='localhost:9200'
APP_SECRET=SECRET
APP_DEFAULT_LOCALE=en
APP_PRODUCT_AND_PRODUCT_MODEL_INDEX_NAME=akeneo_pim_product_and_product_model
MAILER_URL=null://localhost
AKENEO_PIM_URL=http://${VHOST}
APP_ELASTICSEARCH_TOTAL_FIELDS_LIMIT=10000
The following entries must be changed here:
- APP_DATABASE_HOST: Should be set to localhost if the database is on your cluster, which is the normal case. Otherwise the hostname of the external database server must be entered here.
- APP_DATABASE_NAME: Here NUMBER must be replaced by the database number that was shown to you when you created the database.
- APP_DATABASE_USER: Here NUMBER must be replaced by the database user number that was shown to you when you created the database.
- APP_DATABASE_PASSWORD: PASSWORD must be replaced here by the database password that was shown to you when you created the database.
- APP_INDEX_HOSTS: 9200 must be replaced here with the correct port number of the Elastic/Opensearch instance that was shown to you when you created the Search instance.
- APP_SECRET: At this point, the word SECRET must be replaced with the previously created 50 character Secret.
- AKENEO_PIM_URL: The variable ${VHOST} would need to be replaced with the name of the domain created.
Akeneo installation
Now the installation of Akeneo itself can begin. You first change to the Akeneo directory:
cd akeneoYou can start the installation as follows:
NO_DOCKER=true make prodIf you get a prompt, please confirm it by typing y followed by the Enter key.
As soon as the installation is finished, change to the htdocs directory:
cd ../htdocsYou now create the .htaccess file in which you activate the rewrites:
nano .htaccessHere you enter the following content:
RewriteEngine On
RewriteCond %{REQUEST_FILENAME} !-f
RewriteRule ^(.*)$ index.php [QSA,L]
For the last two steps of setting up Akeneo, you now switch back to the Managed Center. There you have to finally enter the cronjobs and finish setting up Supervisor.
Set up cronjobs
You can create cronjobs on the command line using crontab -e or use the Managed Center to do so. The following instructions show how to set them up using the Managed Center:
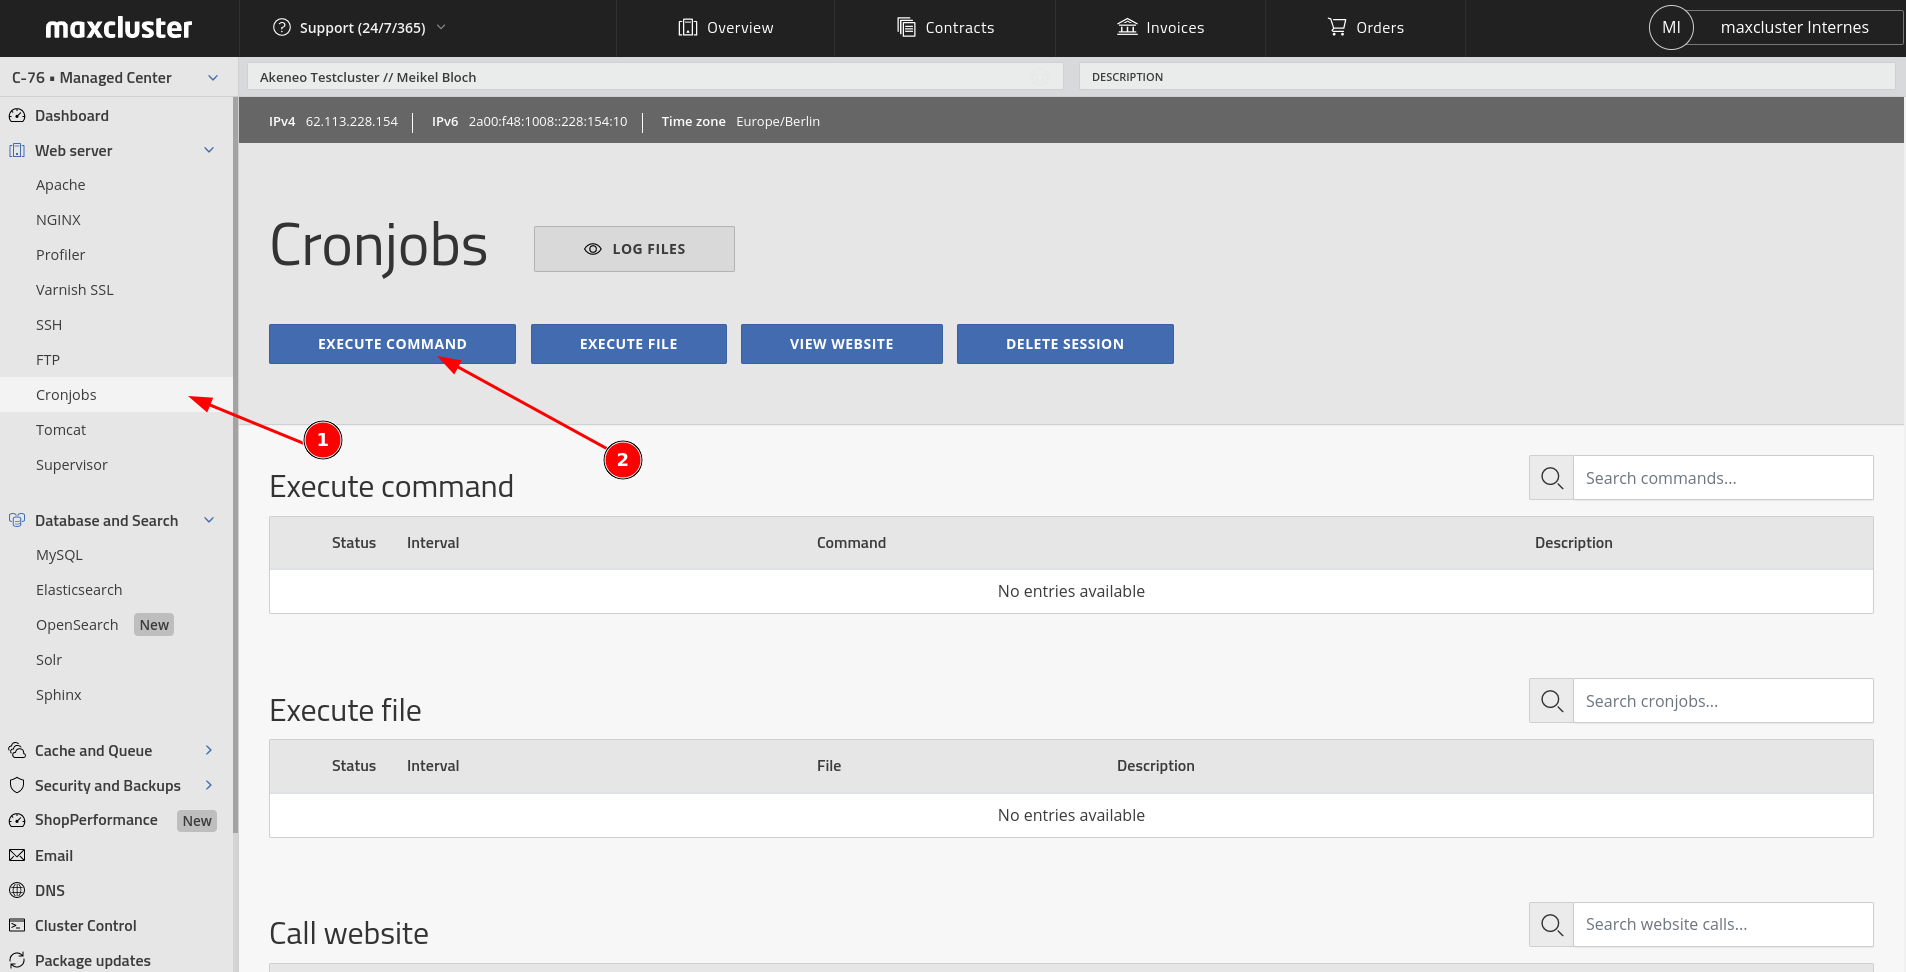
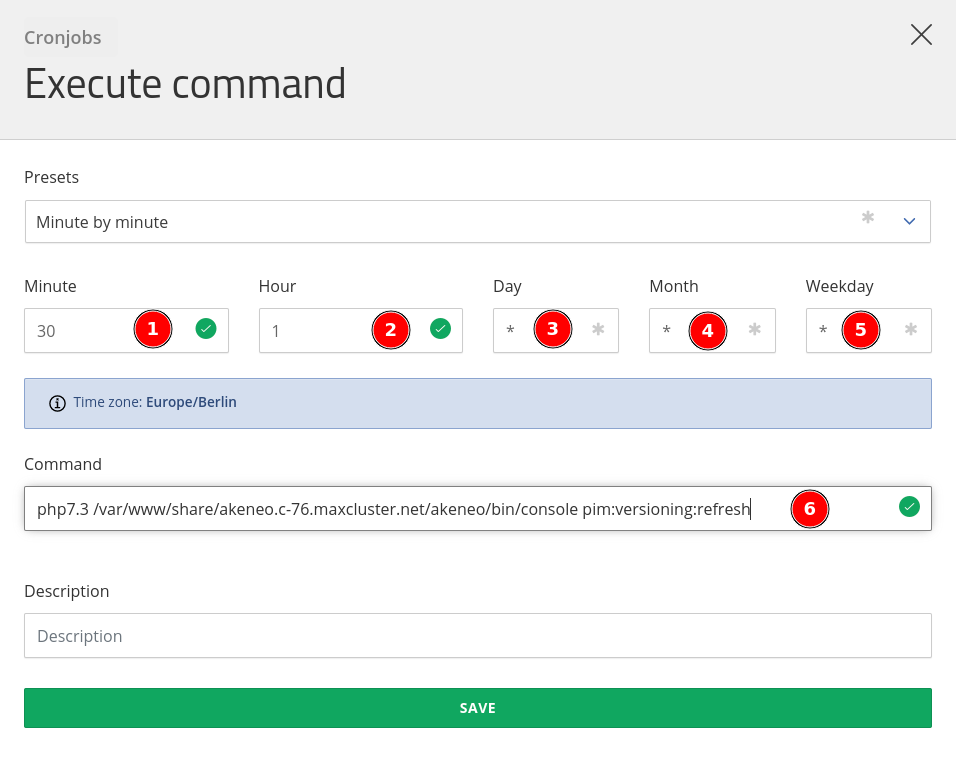
We add here as an example the first cronjob of Akeneo 4. The procedure is the same for all cronjobs. A list of cronjobs can be found below. For each cronjob, add the first five numbers or characters in fields 1-5 and the command string after them in the Command text box:
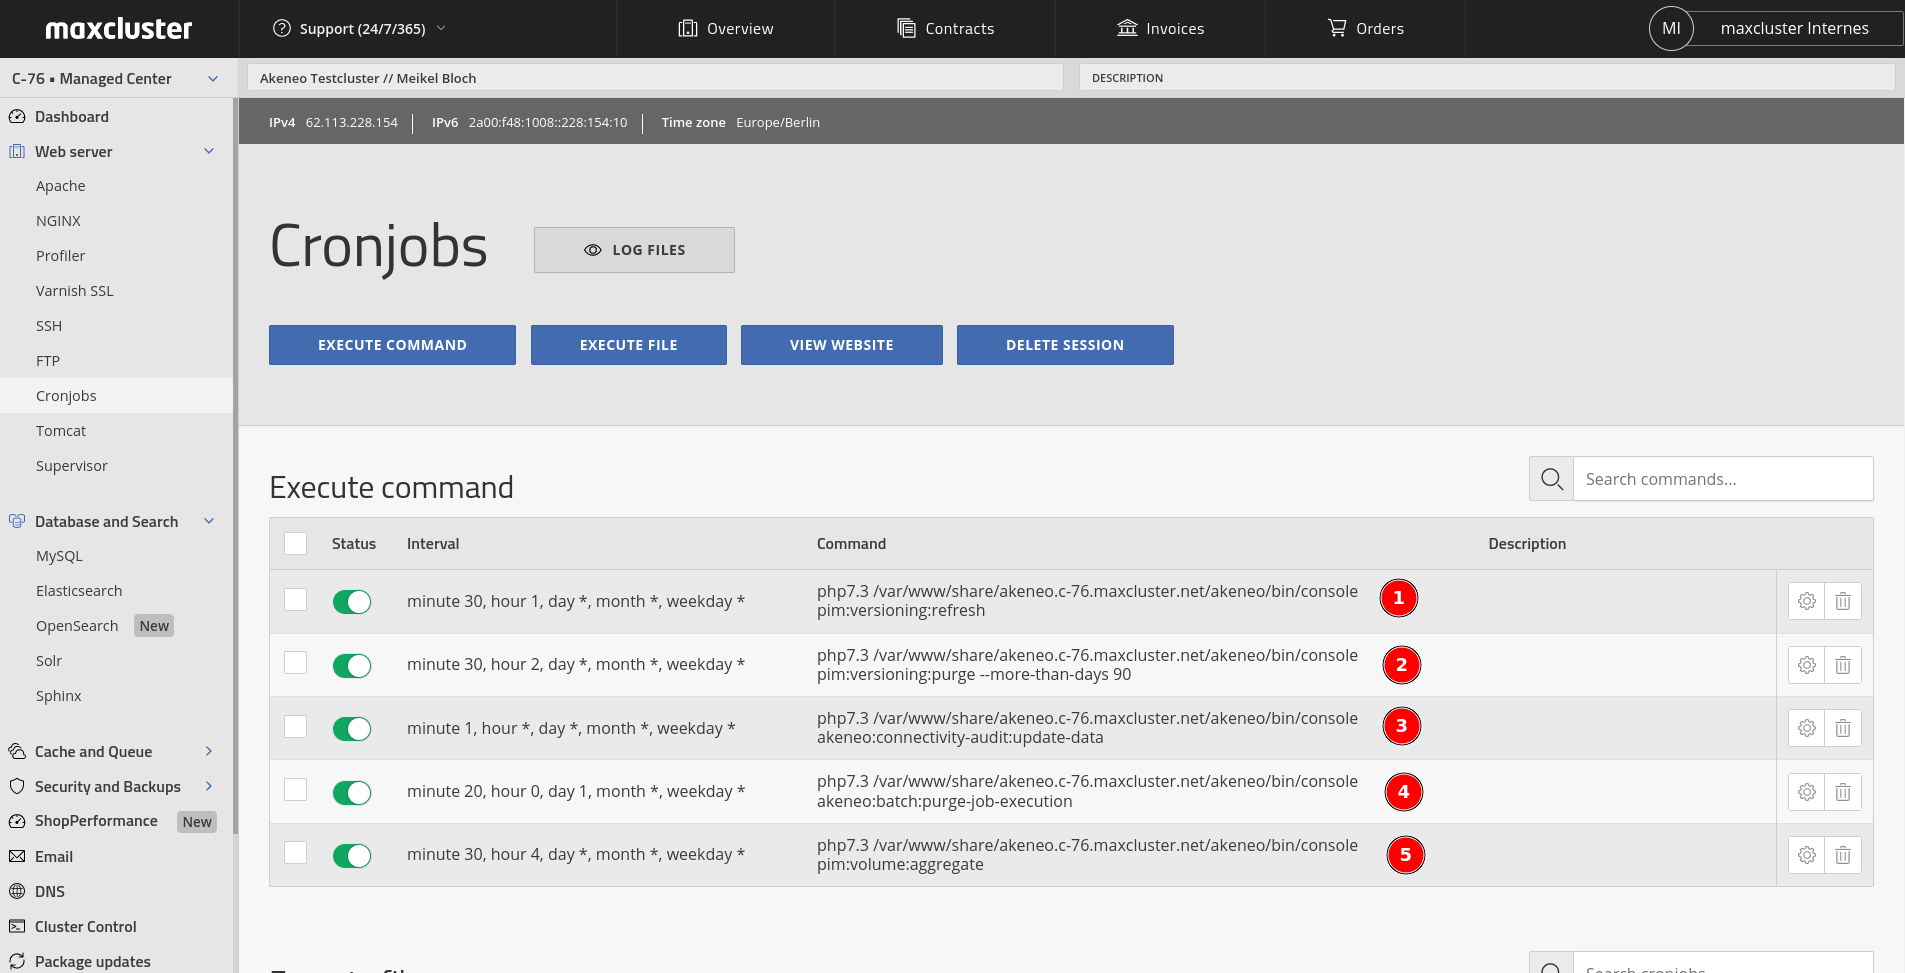
List of cronjobs for all supported Akeneo versions.
Here is the listing of cronjobs for each Akeneo version:
Akeneo 4
30 1 * * php7.3 /var/www/share/${VHOST}/akeneo/bin/console pim:versioning:refresh
30 2 * * * php7.3 /var/www/share/${VHOST}/akeneo/bin/console pim:versioning:purge --more-than-days 90
1 * * * php7.3 /var/www/share/${VHOST}/akeneo/bin/console akeneo:connectivity-audit:update-data
20 0 1 * * php7.3 /var/www/share/${VHOST}/akeneo/bin/console akeneo:batch:purge-job-execution
30 4 * * php7.3 /var/www/share/${VHOST}/akeneo/bin/console pim:volume:aggregate
Akeneo 5
30 1 * * php7.4 /var/www/share/${VHOST}/akeneo/bin/console pim:versioning:refresh
30 2 * * * php7.4 /var/www/share/${VHOST}/akeneo/bin/console pim:versioning:purge --more-than-days 90
1 * * * php7.4 /var/www/share/${VHOST}/akeneo/bin/console akeneo:connectivity-audit:update-data
20 0 1 * * php7.4 /var/www/share/${VHOST}/akeneo/bin/console akeneo:batch:purge-job-execution
30 4 * * * php7.4 /var/www/share/${VHOST}/akeneo/bin/console pim:volume:aggregate
10 * * * php7.4 /var/www/share/${VHOST}/akeneo/bin/console akeneo:connectivity-connection:purge-error
40 12 * * php7.4 /var/www/share/${VHOST}/akeneo/bin/console akeneo:connectivity-audit:purge-error-count
15 0 * * php7.4 /var/www/share/${VHOST}/akeneo/bin/console pim:data-quality-insights:schedule-periodic-tasks
*/10 * * * php7.4 /var/www/share/${VHOST}/akeneo/bin/console pim:data-quality-insights:prepare-evaluations
*/30 * * * php7.4 /var/www/share/${VHOST}/akeneo/bin/console pim:data-quality-insights:evaluations
0 */2 * * php7.4 /var/www/share/${VHOST}/akeneo/bin/console akeneo:messenger:doctrine:purge-messages messenger_messages default
Akeneo 6
30 1 * * php8.0 /var/www/share/${VHOST}/akeneo/bin/console pim:versioning:refresh
30 2 * * * php8.0 /var/www/share/${VHOST}/akeneo/bin/console pim:versioning:purge --more-than-days 90
1 * * * php8.0 /var/www/share/${VHOST}/akeneo/bin/console akeneo:connectivity-audit:update-data
20 0 1 * * php8.0 /var/www/share/${VHOST}/akeneo/bin/console akeneo:batch:purge-job-execution
30 4 * * * php8.0 /var/www/share/${VHOST}/akeneo/bin/console pim:volume:aggregate
10 * * * php8.0 /var/www/share/${VHOST}/akeneo/bin/console akeneo:connectivity-connection:purge-error
40 12 * * php8.0 /var/www/share/${VHOST}/akeneo/bin/console akeneo:connectivity-audit:purge-error-count
15 0 * * php8.0 /var/www/share/${VHOST}/akeneo/bin/console pim:data-quality-insights:schedule-periodic-tasks
*/10 * * * php8.0 /var/www/share/${VHOST}/akeneo/bin/console pim:data-quality-insights:prepare-evaluations
*/30 * * * php8.0 /var/www/share/${VHOST}/akeneo/bin/console pim:data-quality-insights:evaluations
0 */2 * * php8.0 /var/www/share/${VHOST}/akeneo/bin/console akeneo:messenger:doctrine:purge-messages messenger_messages default
5 * * * php8.0 /var/www/share/${VHOST}/akeneo/bin/console akeneo:connectivity-connection:purge-events-api-logs
0 0 * * 0 php8.0 /var/www/share/${VHOST}/akeneo/bin/console akeneo:connectivity-connection:openid-keys:create
When entering the cronjobs, please make sure that you replace the ${VHOST} placeholder with your chosen domain.
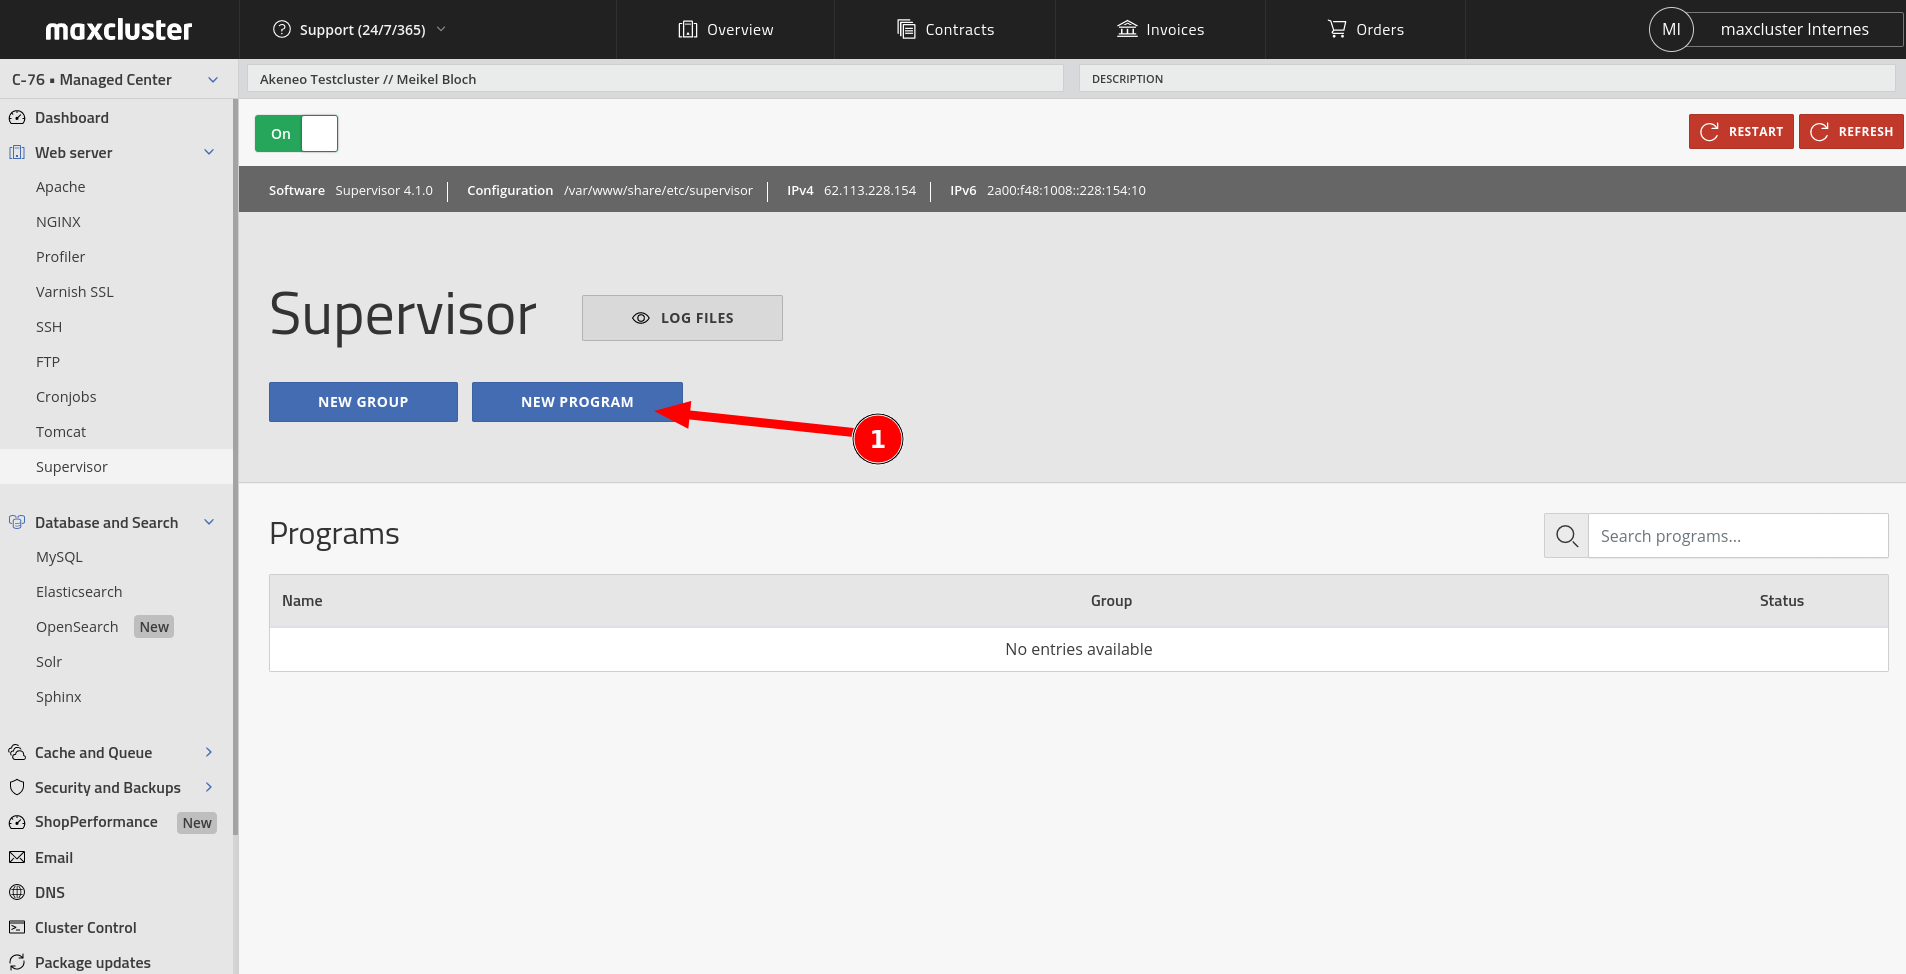
Set up supervisor program
The last thing you need to do now is finish setting up Supervisor. This can only be done after Akeneo has been successfully installed. This is about creating a new supervisor program. Follow the instructions in the screenshot:
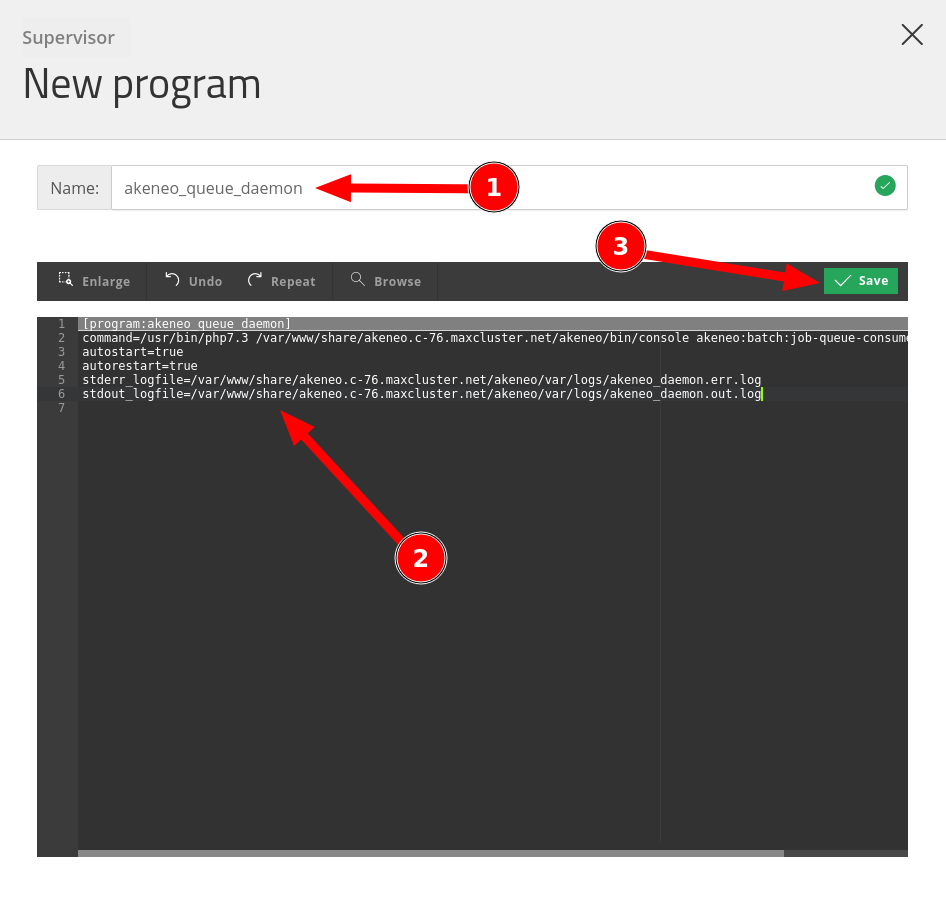
You can find the Akeneo version-specific supervisor programs below:
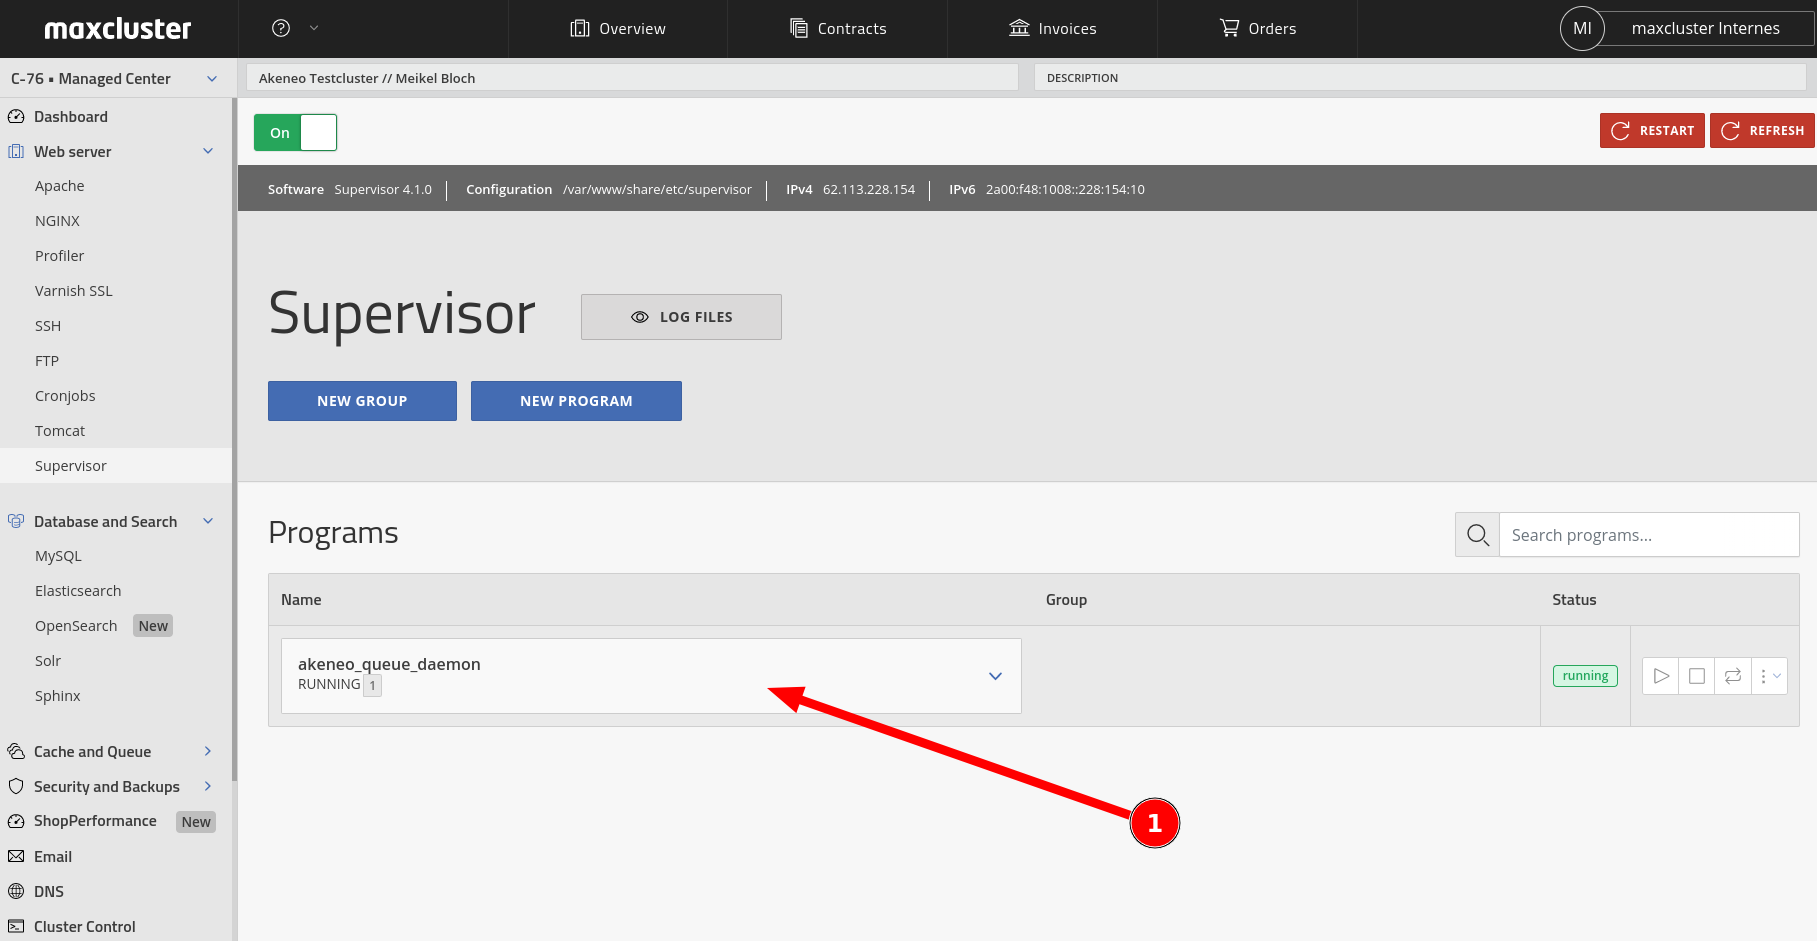
If Supervisor is set up correctly, it should look like the screenshot below:
List of supervisor programs of all supported Akeneo versions.
When it comes to programs, there are also slight differences in the Akeneo versions used. Below you will find the corresponding list:
Akeneo 4
[program:akeneo_queue_daemon]
command=/usr/bin/php7.3 /var/www/share/${VHOST}/akeneo/bin/console akeneo:batch:job-queue-consumer-daemon --env=prod
autostart=true
autorestart=true
stderr_logfile=/var/www/share/${VHOST}/akeneo/var/logs/akeneo_daemon.err.log
stdout_logfile=/var/www/share/${VHOST}/akeneo/var/logs/akeneo_daemon.out.log
Akeneo 5
[program:akeneo_queue_daemon]
command=/usr/bin/php7.4 /var/www/share/${VHOST}/akeneo/bin/console akeneo:batch:job-queue-consumer-daemon --env=prod
autostart=true
autorestart=true
stderr_logfile=/var/www/share/${VHOST}/akeneo/var/logs/akeneo_daemon.err.log
stdout_logfile=/var/www/share/${VHOST}/akeneo/var/logs/akeneo_daemon.out.log
Akeneo 6
[program:akeneo_queue_daemon]
command=/usr/bin/php8.0 /var/www/share/${VHOST}/akeneo/bin/console messenger:consume ui_job import_export_job data_maintenance_job --env=prod -vv # optional: --limit=3
autostart=true
autorestart=true
stderr_logfile=/var/www/share/${VHOST}/akeneo/var/logs/akeneo_daemon.err.log
stdout_logfile=/var/www/share/${VHOST}/akeneo/var/logs/akeneo_daemon.out.log
When entering the program code, please make sure that you replace the variable ${VHOST} with the appropriate created domain.
If you have any questions or need support, please feel free to contact our service by e-mail support@maxcluster.de or by phone +49 5251 41 41 30.