Installation guide for Pimcore
With this installation guide we will take you step by step through the installation of Pimcore on your cluster.
Table of contents
At maxcluster it is possible to host Pimcore versions 6.9 as well as 10.5. Hosting of the next Pimcore major version 11.0 will also be possible as soon as it is officially released.
For new customers, the system requirements are already installed or pre-installed when the web cluster is provided.
We recommend that our existing customers contact our technical support team by e-mail or telephone to check whether the system requirements are met. Our technical support team will be happy to help you at beratung@maxcluster.de or by phone at +49 (0) 5251 4141-350.
Check system requirements
You can find a list of the system requirements that Pimcore comes with in the respective version in our related FAQ article.
Preparations
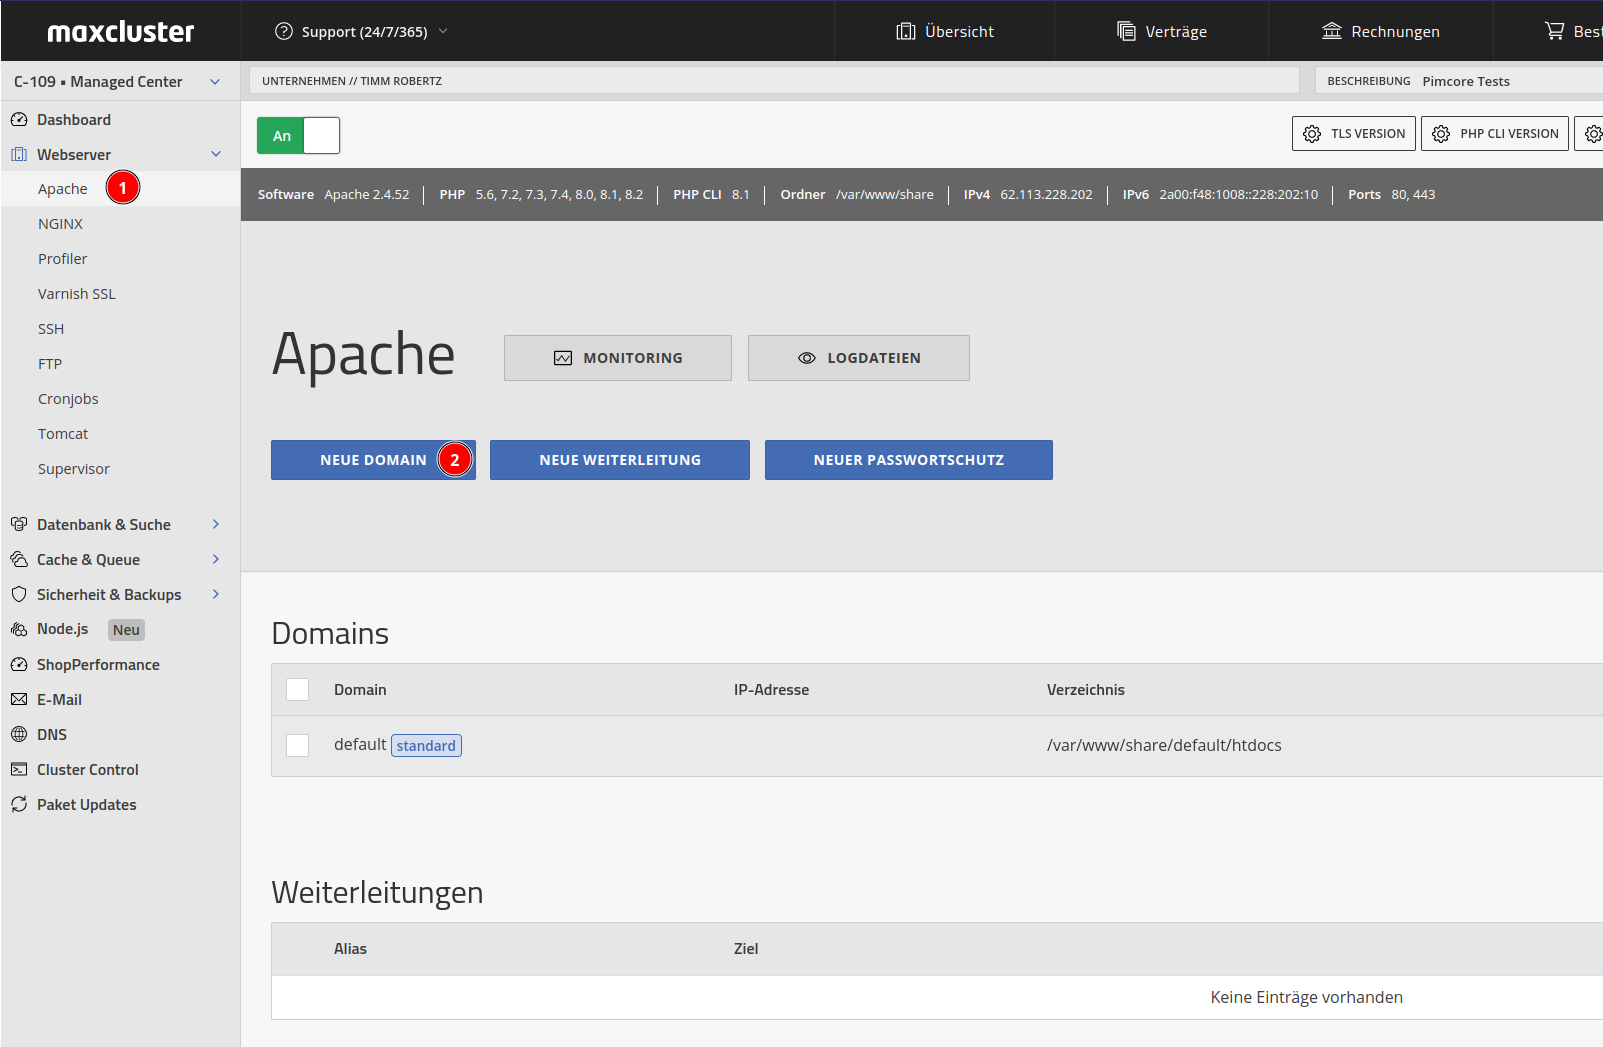
To be able to run Pimcore on your web cluster, you need a new domain. To do this, you first need to select a web server in our Managed Center. At maxcluster you have the choice between Apache and NGINX. We recommend the use of Apache. If you would like to use NGINX instead, please contact our service team.
Set up Apache
Due to the .htaccess file provided, it is usually not necessary to make any changes to the configuration of Apache. There is one exception when using Pimcore 10.5.
Create a domain
The following is an example of how to set up Pimcore under Apache. Log into the Managed Center and follow the instructions on the screenshots to switch to the Apache section and create a new domain:
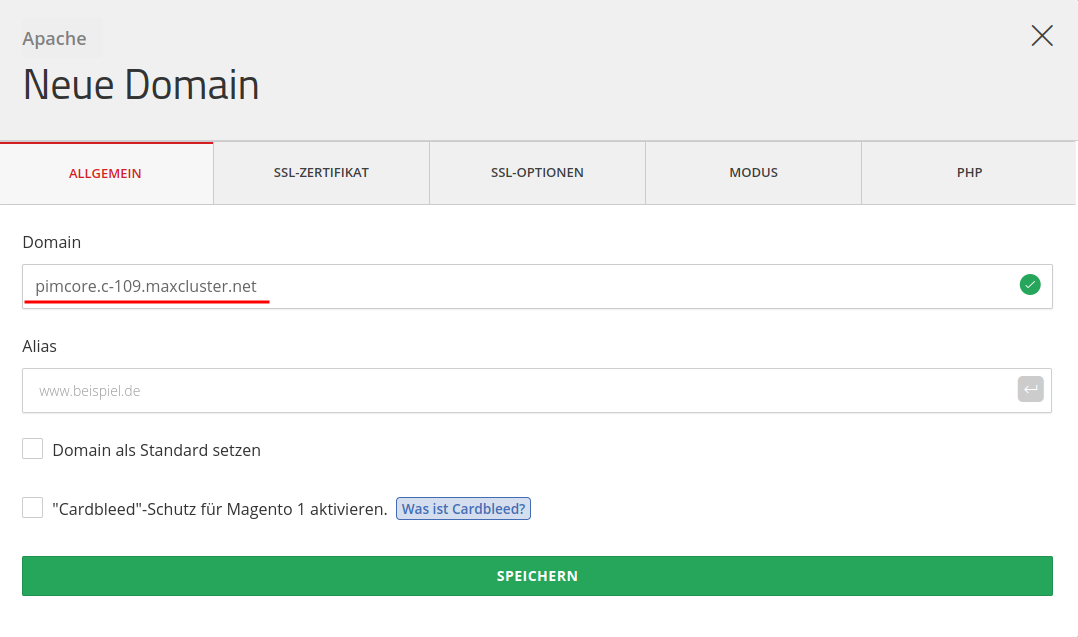
Enter the desired domain name in the "Domain" field. We use the name "pimcore.c-109.maxcluster.net" for this documentation in the screenshots. Whenever you see this domain name or the placeholder ${VHOST} in the further course of these instructions, you should replace it with the domain name you chose in this step.
Note that you use a new domain name here, as all files in the DocumentRoot of this domain will be deleted in the later course of the installation.
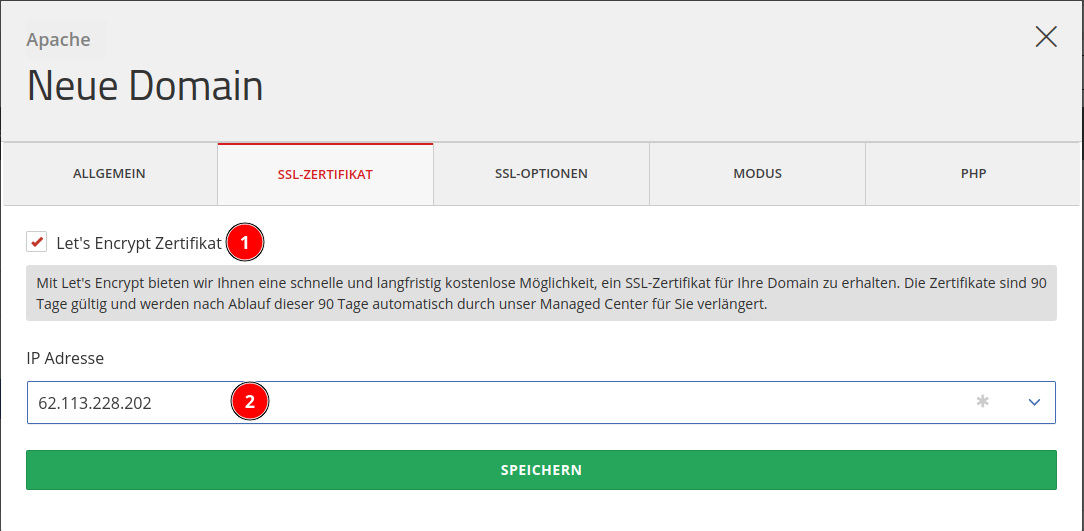
Then switch to the "SSL certificate" tab, tick "Let's Encrypt certificate" and select the IP address of the cluster in the pull-down menu. This serves to set up a Let's Encrypt SSL certificate so that your website can be accessed via HTTPS:
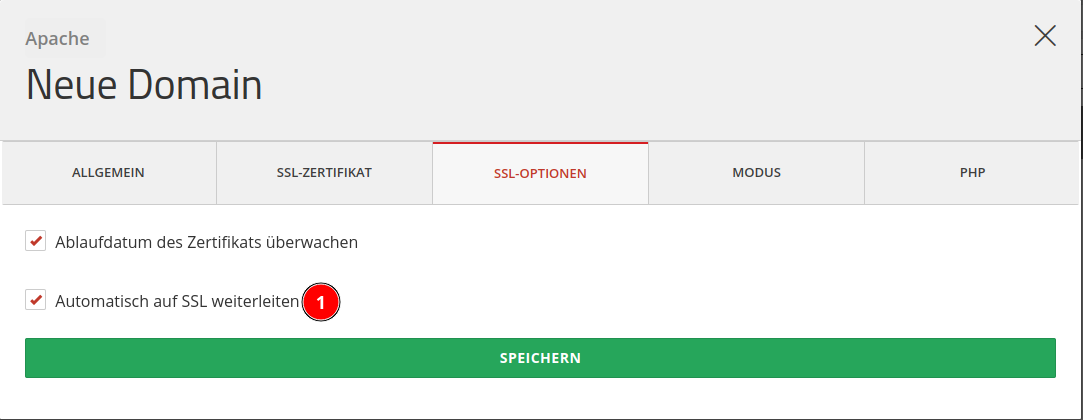
Then switch to the tab "SSL options". There, activate the automatic forwarding to SSL so that your Pimcore instance can only be accessed in encrypted form:
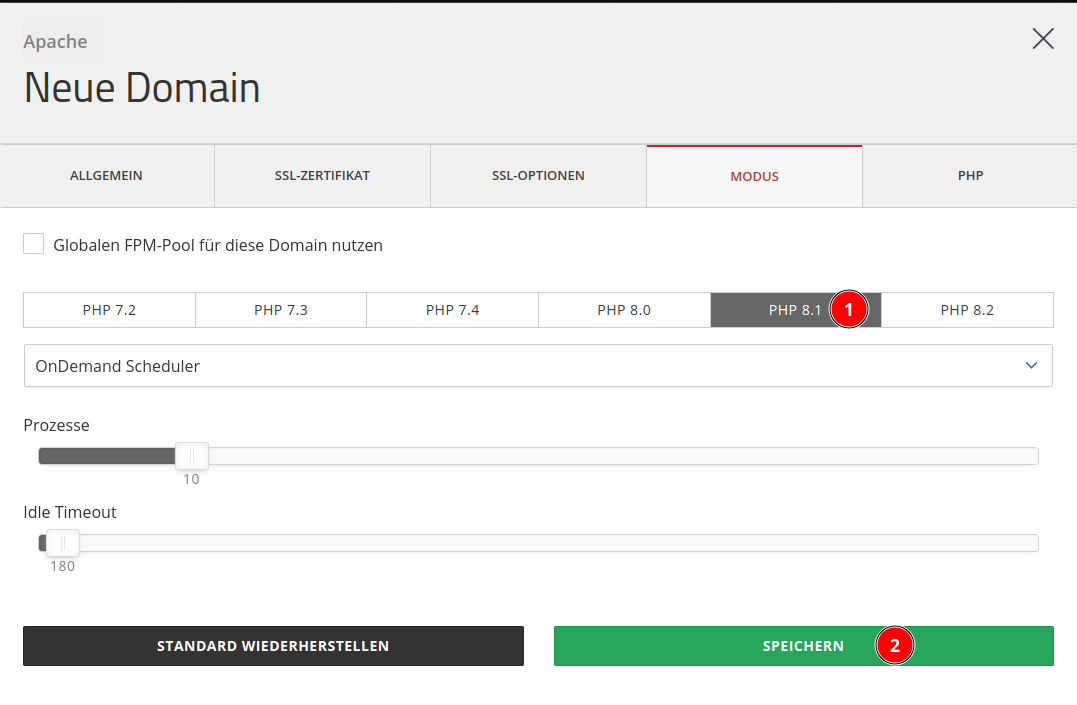
Set PHP version
Depending on the Pimcore version you are using, select the appropriate PHP version at the point shown in the screenshot. The correct PHP versions for the Pimcore version are:
- Pimcore 6.9: PHP 8.0
- Pimcore 10.5: ⩾ PHP 8.0
- Pimcore 11 (dev): ⩾ PHP 8.1
In this example, we use PHP 8.1 as the PHP version:
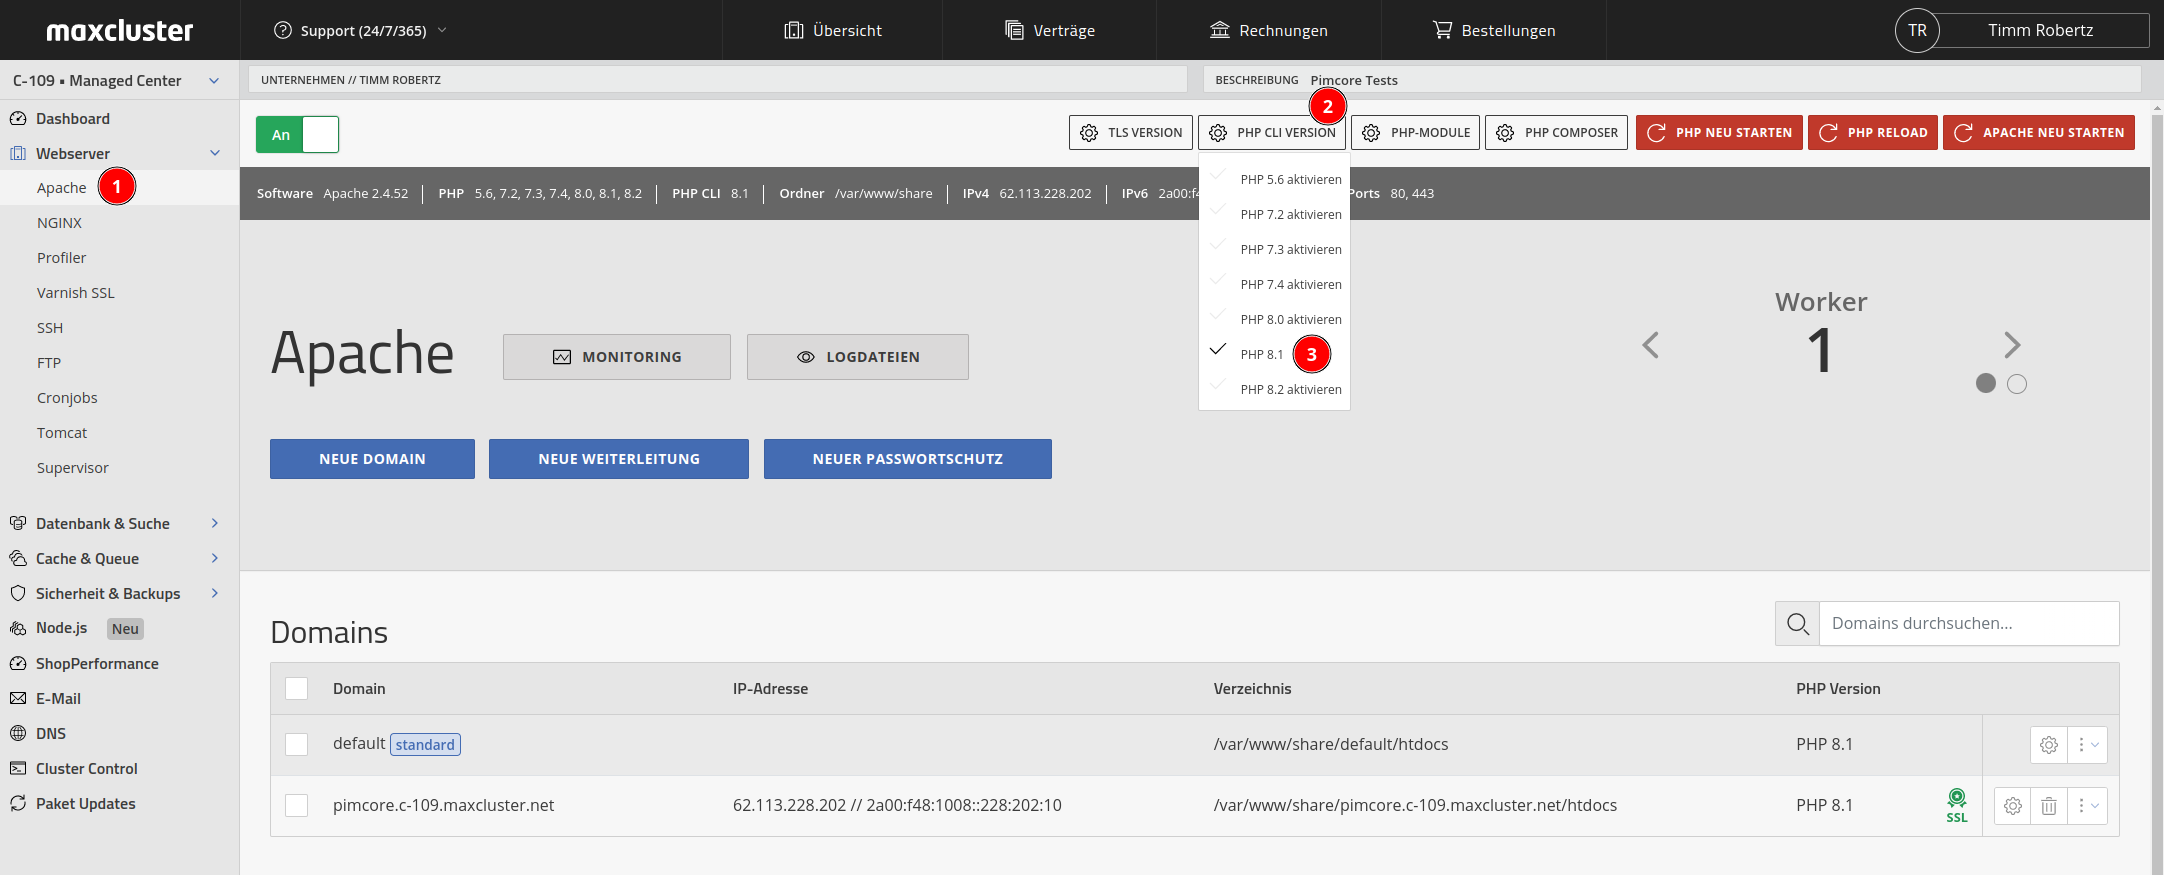
To ensure that the cronjobs run without errors later on, you still need to set the PHP CLI version that matches your Pimcore version. Select the appropriate PHP version as shown in the screenshot:
- Pimcore 6.9: PHP 8.0
- Pimcore 10.5: ⩾ PHP 8.0
- Pimcore 11 (dev): ⩾ PHP 8.1
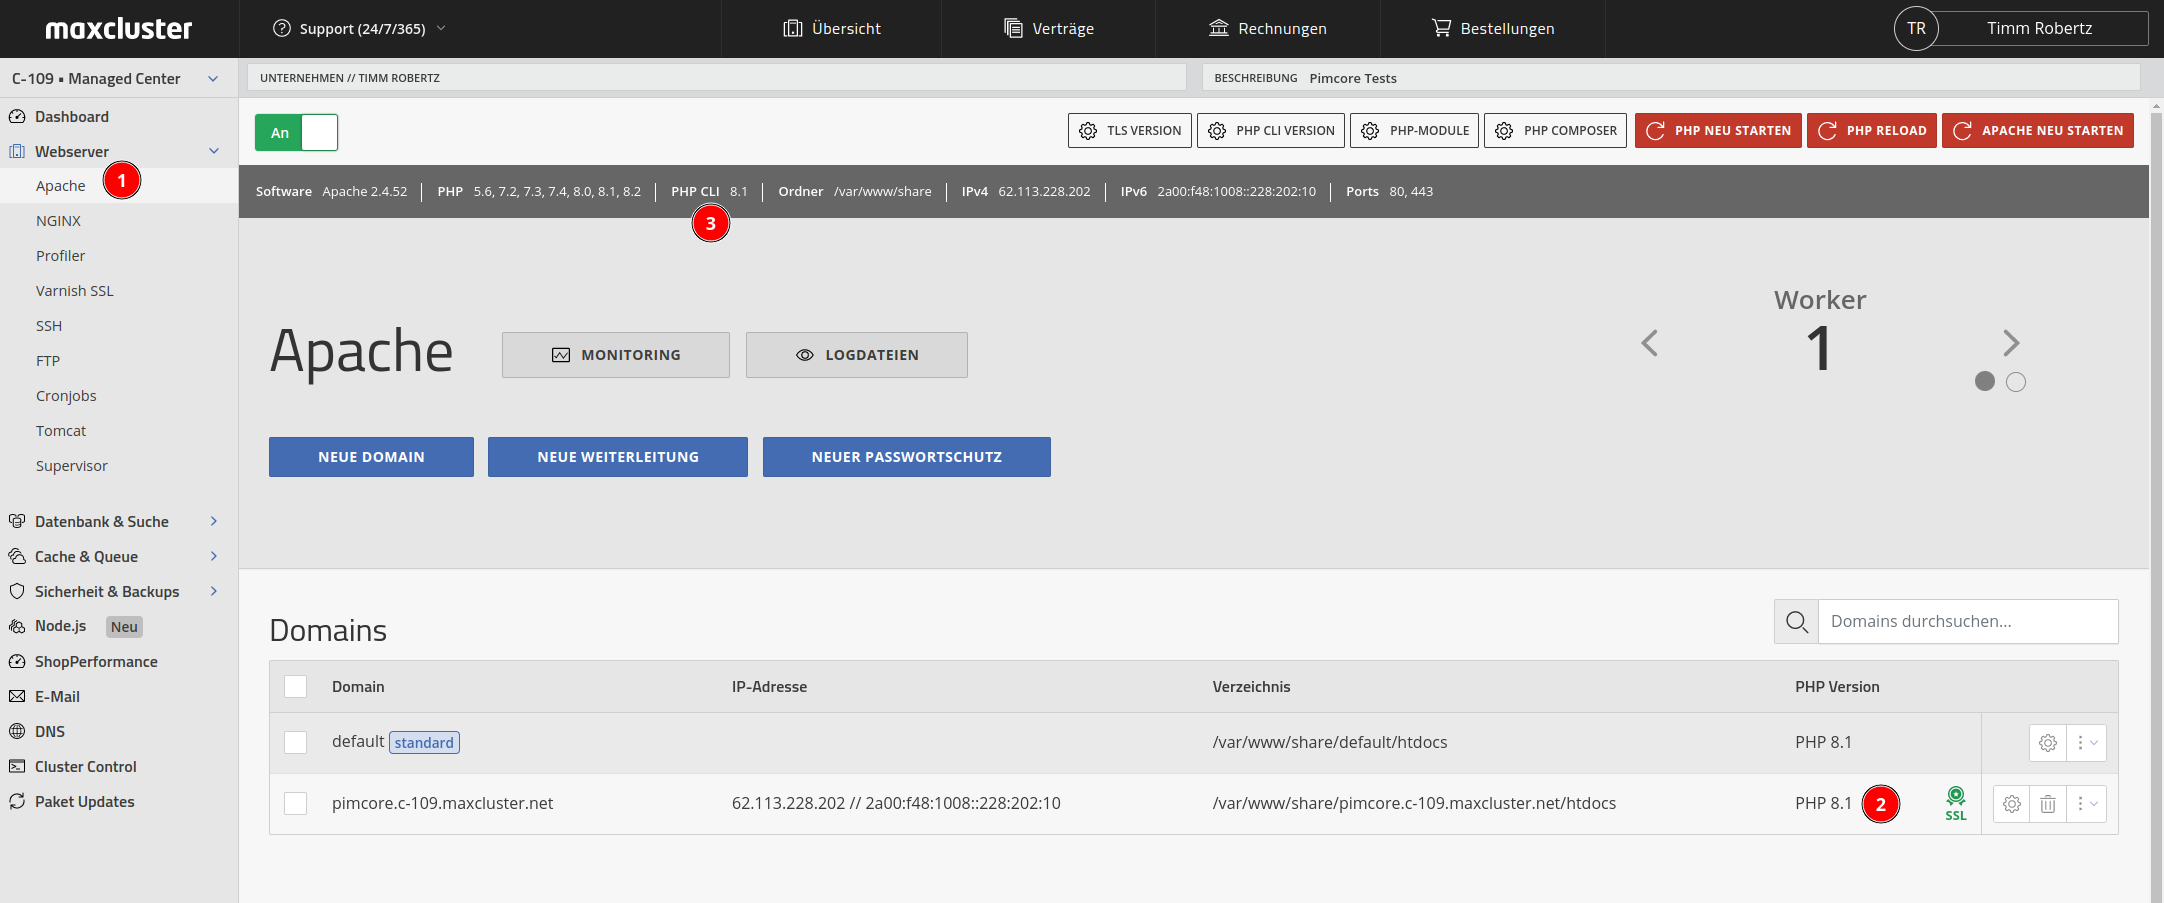
If everything is set correctly, the display in the Managed Center should look like this (in the places marked "2" and "3" you should see the PHP and PHP CLI version that matches the Pimcore version you have installed):
Create a Redis instance
Creating a Redis instance is optional for Pimcore, but highly recommended. If the cache is outsourced to Redis, the performance of Pimcore can be significantly improved.
To create a new instance, click on one of the two "New Redis Server" buttons in the Managed Center under Cache & Queue > Redis. First create a description for the new Redis instance. In the example, we have chosen "Pimcore" as the description text.
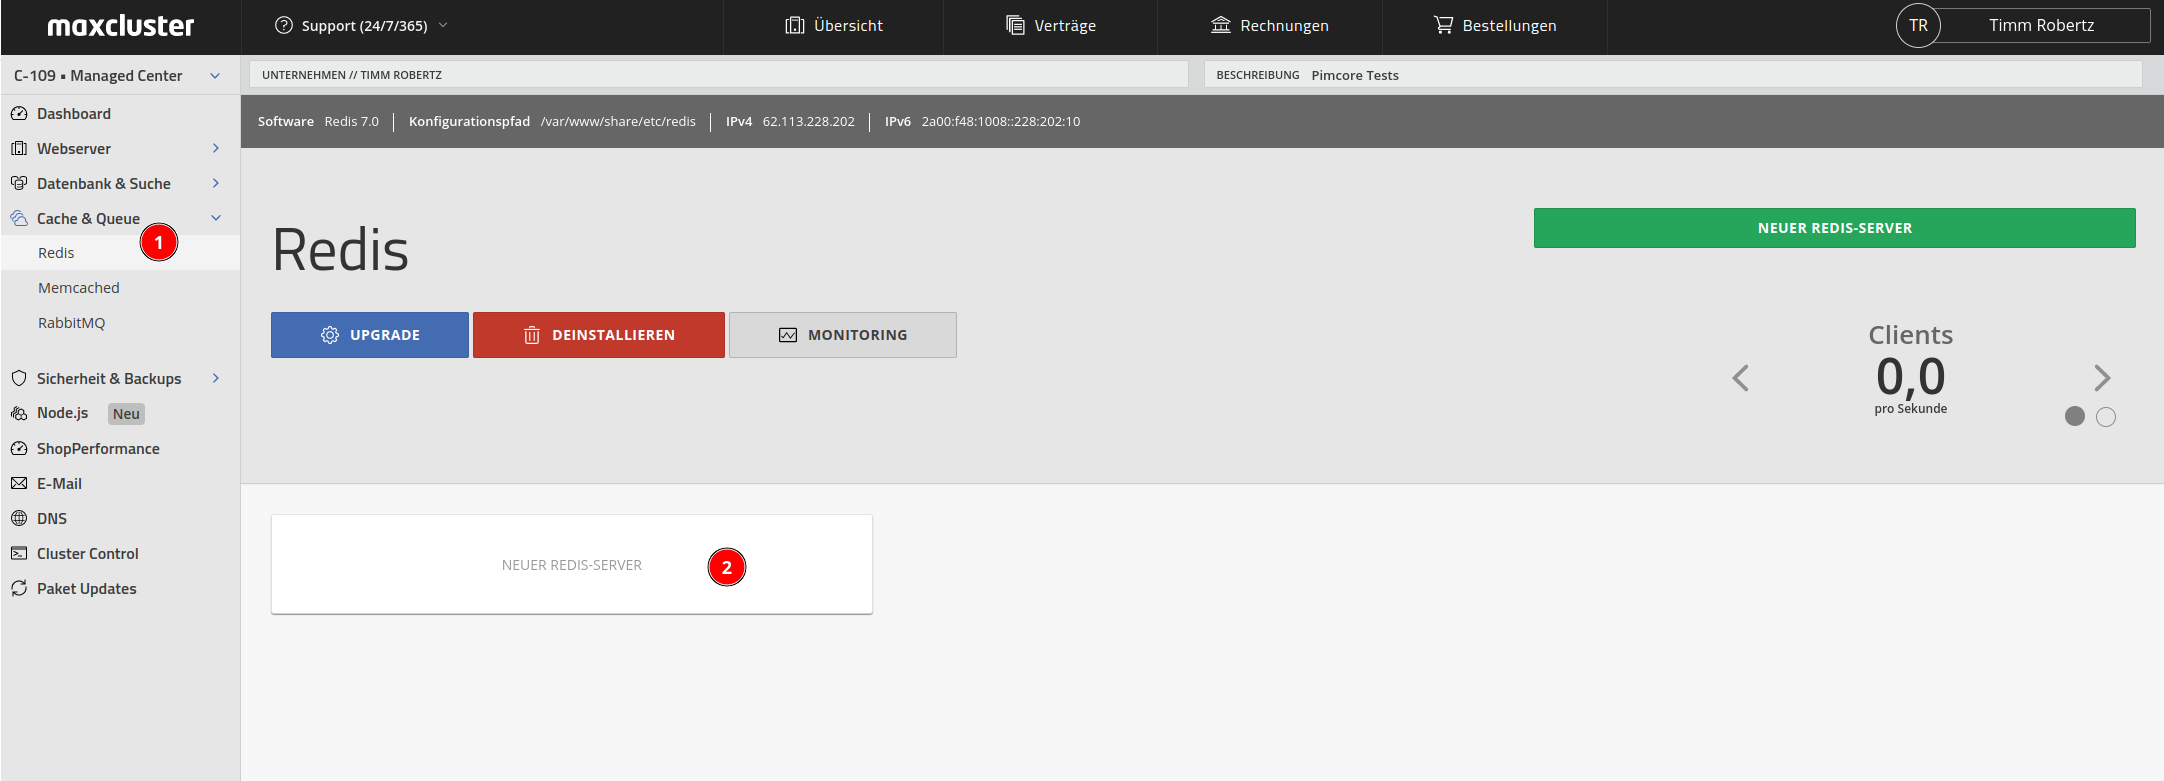
Now set the instance to "Optimised for Cache", set 1 GB RAM under "Working Memory" and select the setting "volatile-lru" under "Max Memory Policy":
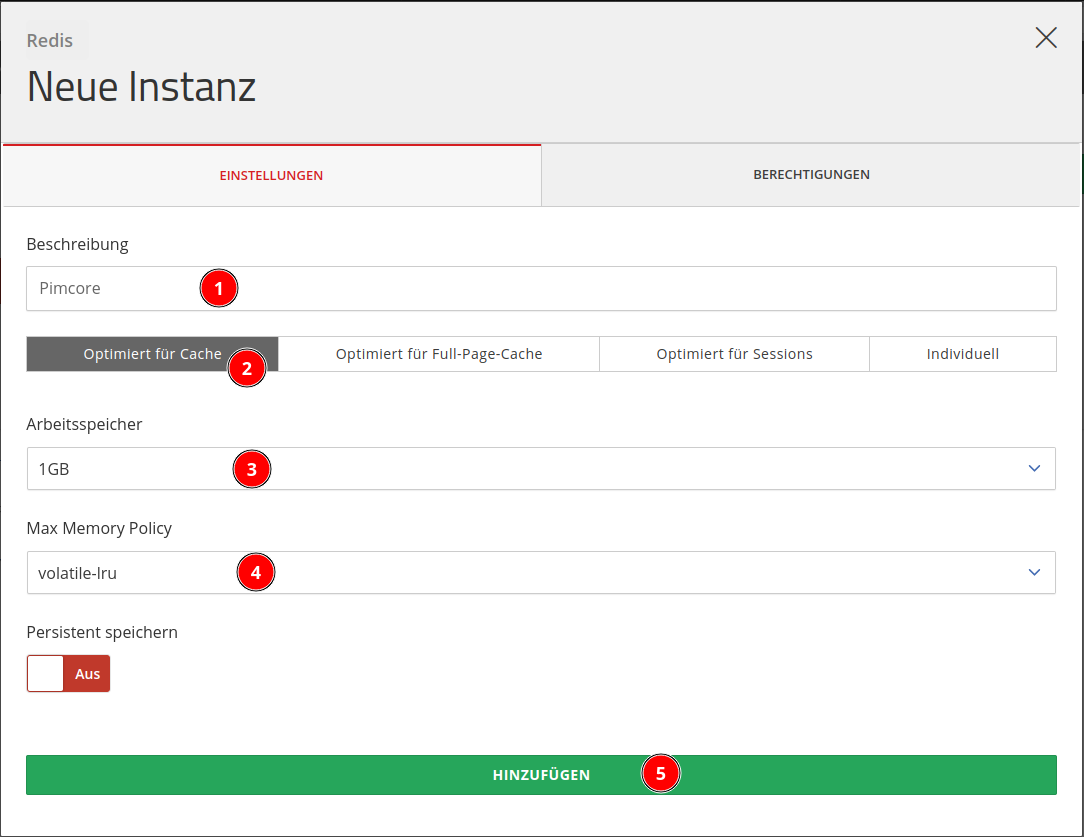
Then save the port, as you will need it later to adjust the environment variables:
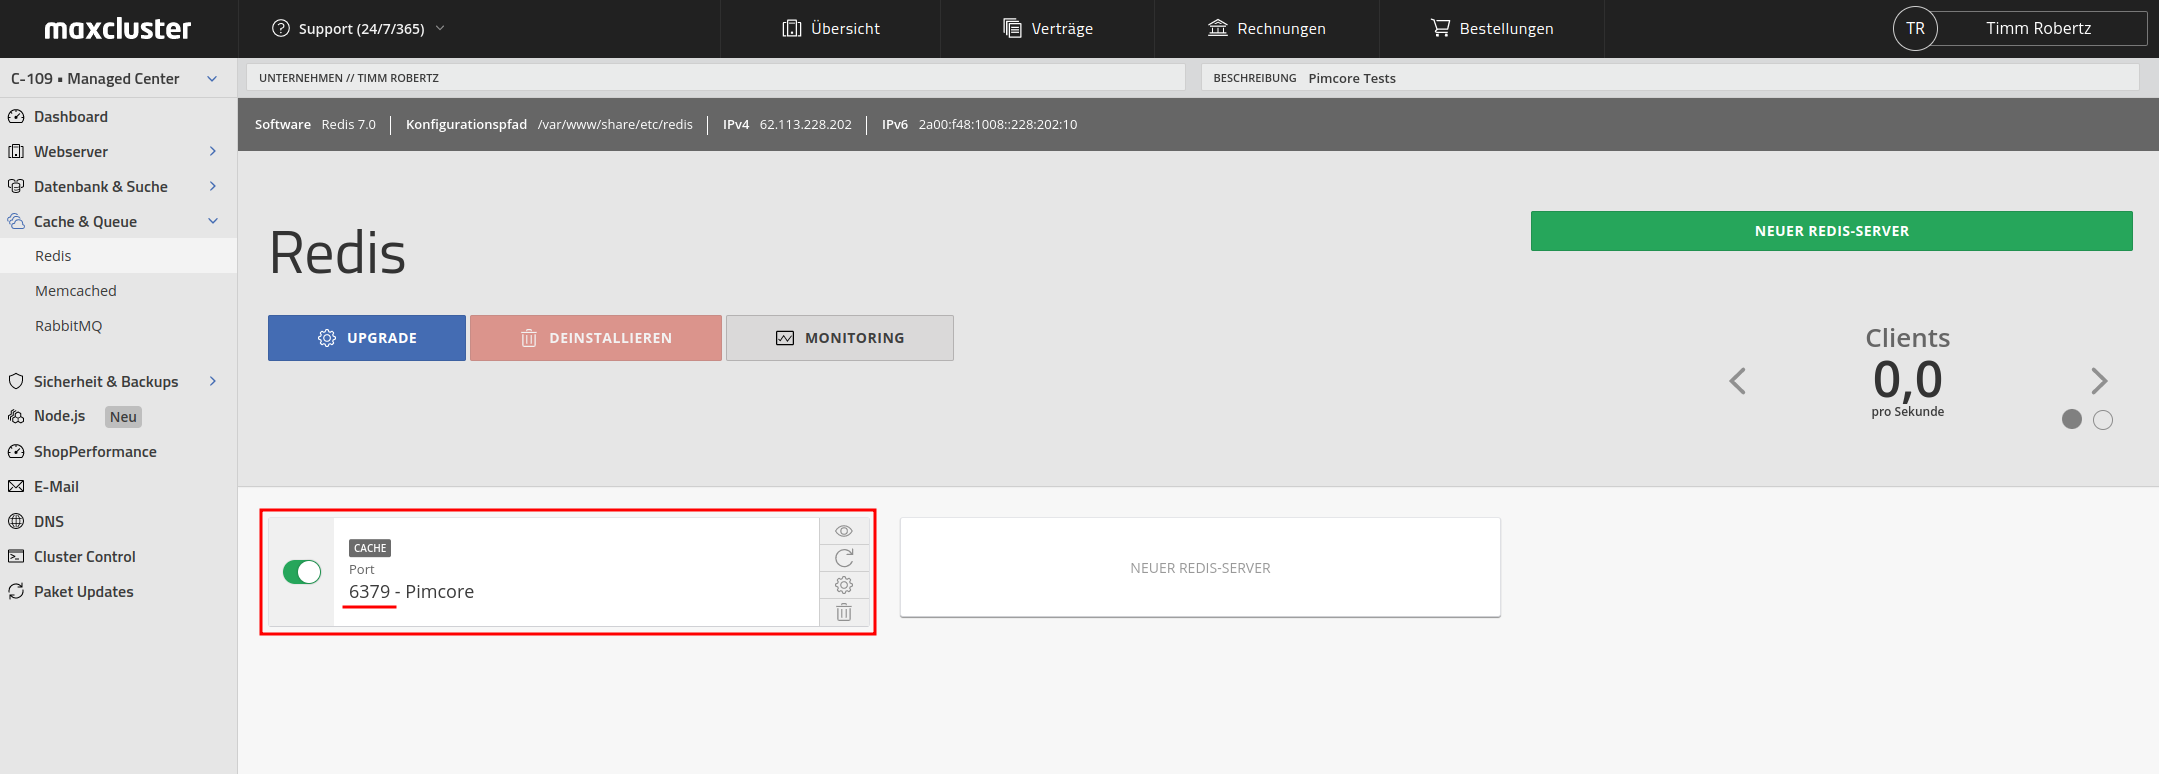
Create MySQL database
Select one of the two "New database" buttons under Database and Search > MySQL and give the database a suitable description in the next step:
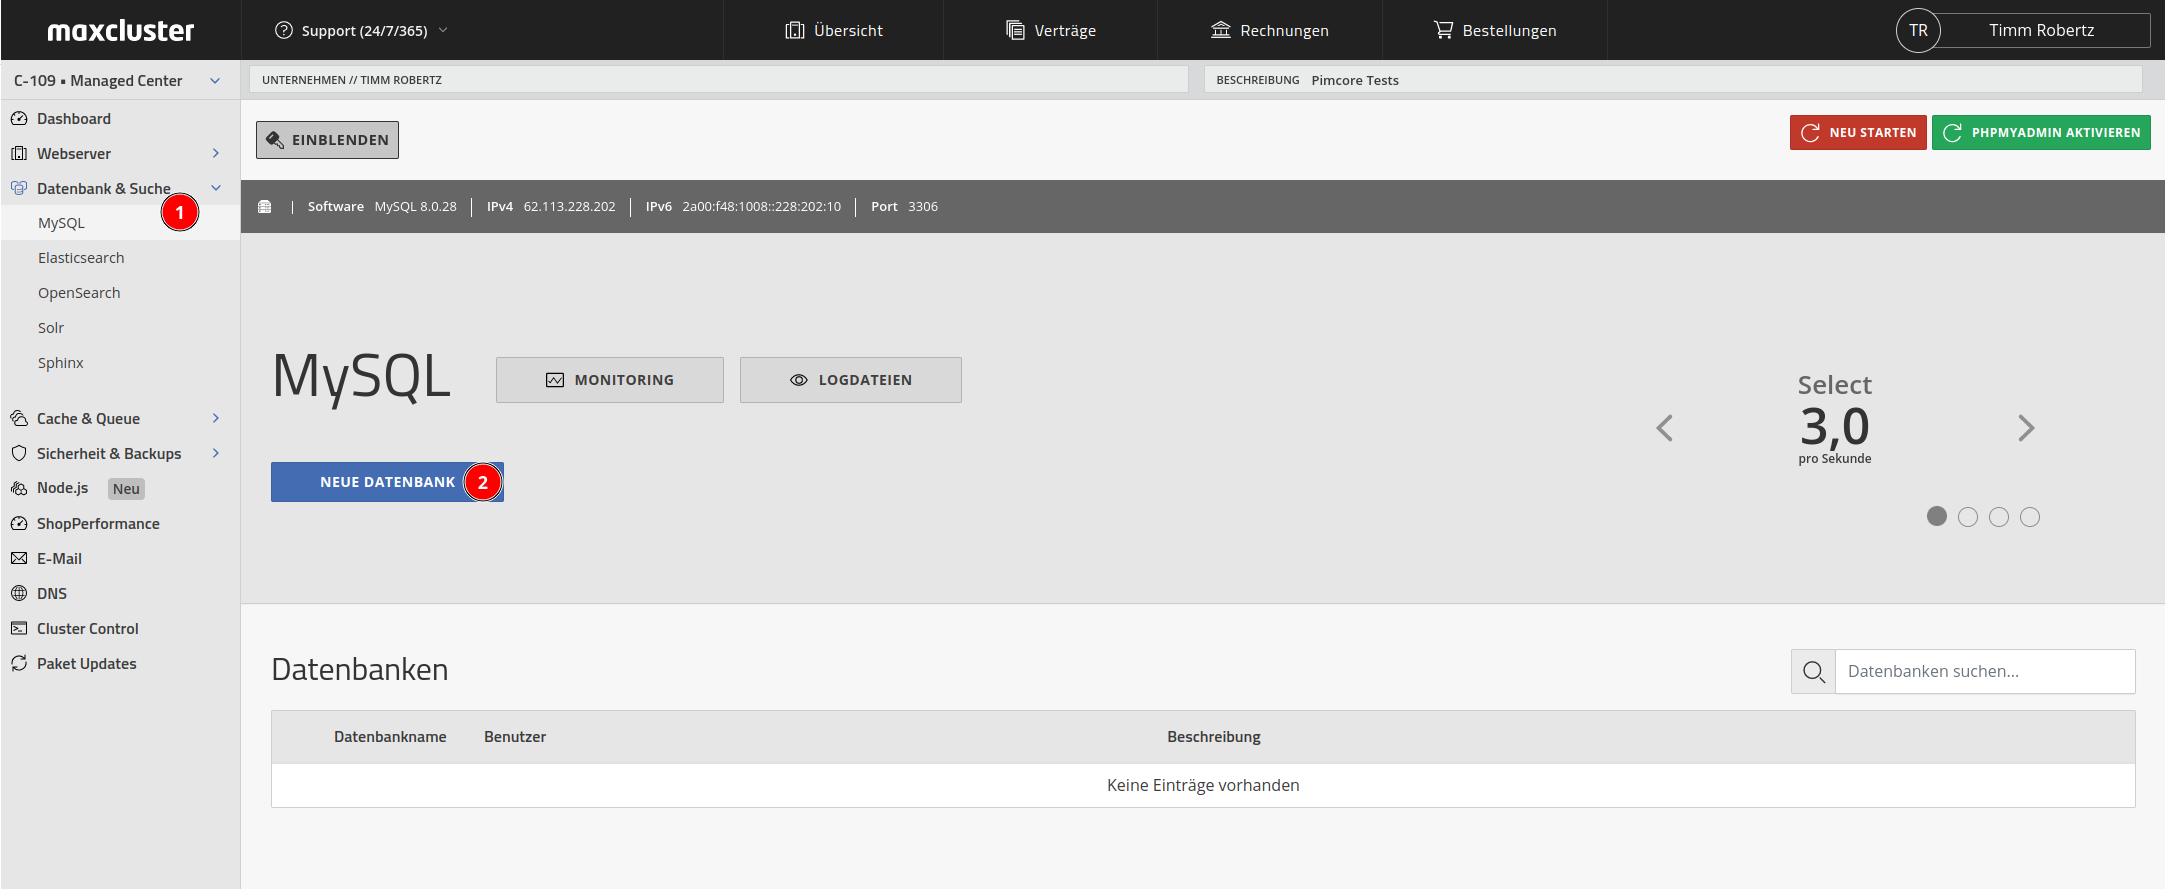
The description text helps you to keep track of the affiliation within the Managed Centre. In the following example, we have chosen "Pimcore" as the description text:
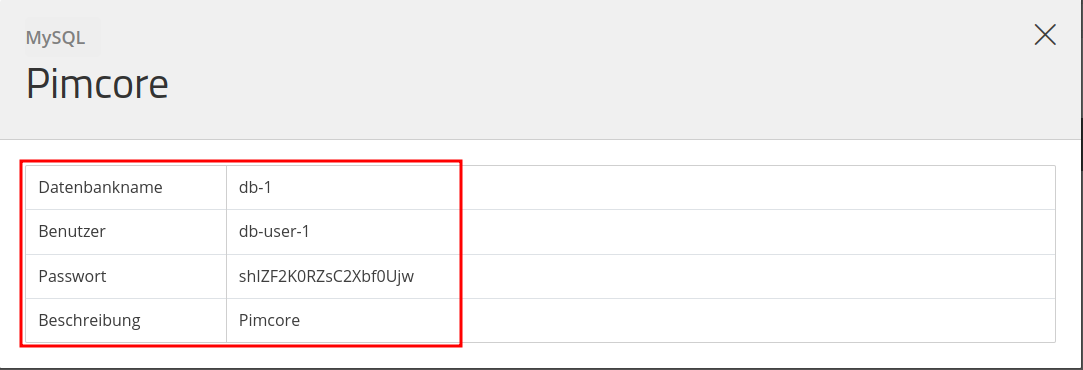
You will then be shown the access data for the database. Please save the database name, the database user and the database password temporarily, as you will also need these later for adjusting the environment variables:
Install Pimcore
Carry out the following steps in the given order.
Set environment variables
Before you can set the environment variables, you must first create a vHost and a database. Now you need the database name, user and password of your MySQL database as well as the name of the vHost (in this case "pimcore.c-109.maxcluster.net"). In the following example, we use placeholders for the environment variables. Please note that these placeholders must be replaced by individually set values!
VHOST=pimcore.c-109.maxcluster.net
PROJEKTNAME=pimcore
MYSQL_USERNAME=db-user-1
MYSQL_PASSWORD=supersicheresPasswort
MYSQL_DB=db-1
PIMCORE_ADMIN=admin
PIMCORE_PASSWORD=supersicheresPasswort
Download Pimcore
Now you can start downloading the respective Pimcore version:
Pimcore 6.9
For Pimcore 6.9 you have to execute the following command:
composer2 create-project pimcore/skeleton:2.8.22 /var/www/share/$VHOST/$PROJEKTNAME --no-cachePimcore 10.5
For Pimcore 10.5 you need to run the following command:
composer2 create-project pimcore/skeleton:10.2.3 /var/www/share/$VHOST/$PROJEKTNAME --no-cachePimcore 11.0
For Pimcore 11.0 you need to run the following command:
composer2 create-project pimcore/skeleton:11.0.0-ALPHA1 /var/www/share/$VHOST/$PROJEKTNAME --no-cacheCreate symlink
Since Pimcore uses a public folder to which the document root must point, a symlink must now be set under the vHost so that the public folder can be delivered by the web server.
rm -r $HOME/$VHOST/htdocs
ln -s $HOME/$VHOST/$PROJEKTNAME/public $HOME/$VHOST/htdocs
cd $HOME/$VHOST/$PROJEKTNAME
Pimcore installation
Install Pimcore by running the non-interactive installer:
./vendor/bin/pimcore-install --admin-username=$PIMCORE_ADMIN --admin-password=$PIMCORE_PASSWORD --mysql-username=$MYSQL_USERNAME --mysql-password=$MYSQL_PASSWORD --mysql-database=$MYSQL_DB --ignore-existing-config -vvv -nSet up cronjobs
Create the following cronjobs via the command line using crontab -e:
cat <(crontab -l) <(echo "*/5 * * * * $HOME/$VHOST/$PROJEKTNAME/bin/console pimcore:maintenance --async") | crontab -

cat <(crontab -l) <(echo "*/5 * * * * $HOME/$VHOST/$PROJEKTNAME/bin/console messenger:consume pimcore_core pimcore_maintenance pimcore_image_optimize --time-limit=300") | crontab -
Create .htaccess file
If you are using Pimcore 10.5, you must now create the following .htaccess file:
nano $HOME/$VHOST/$PROJEKTNAME/public/.htaccessIm nächsten Schritt fügen Sie folgenden Inhalt in die angelegte Datei ein:
# Use the front controller as index file. It serves as a fallback solution when
# every other rewrite/redirect fails (e.g. in an aliased environment without
# mod_rewrite). Additionally, this reduces the matching process for the
# start page (path "/") because otherwise Apache will apply the rewriting rules
# to each configured DirectoryIndex file (e.g. index.php, index.html, index.pl).
DirectoryIndex index.php

# By default, Apache does not evaluate symbolic links if you did not enable this
# feature in your server configuration. Uncomment the following line if you
# install assets as symlinks or if you experience problems related to symlinks
# when compiling LESS/Sass/CoffeScript assets.
# Options FollowSymlinks

# Disabling MultiViews prevents unwanted negotiation, e.g. "/index" should not resolve
# to the front controller "/index.php" but be rewritten to "/index.php/index".
<IfModule mod_negotiation.c>
    Options -MultiViews
</IfModule>

# mime types
AddType video/mp4 .mp4
AddType video/webm .webm
AddType image/webp .webp
AddType image/jpeg .pjpeg

Options +SymLinksIfOwnerMatch

# Use UTF-8 encoding for anything served text/plain or text/html
AddDefaultCharset utf-8

RewriteEngine On

<IfModule mod_headers.c>
    <FilesMatch "\.(jpe?g|png)$">
        Header always unset X-Content-Type-Options
    </FilesMatch>
</IfModule>

# Determine the RewriteBase automatically and set it as environment variable.
# If you are using Apache aliases to do mass virtual hosting or installed the
# project in a subdirectory, the base path will be prepended to allow proper
# resolution of the index.php file and to redirect to the correct URI. It will
# work in environments without path prefix as well, providing a safe, one-size
# fits all solution. But as you do not need it in this case, you can comment
# the following 2 lines to eliminate the overhead.
RewriteCond %{REQUEST_URI}::$1 ^(/.+)/(.*)::\2$
RewriteRule ^(.*) - [E=BASE:%1]

# Sets the HTTP_AUTHORIZATION header removed by Apache
RewriteCond %{HTTP:Authorization} .
RewriteRule ^ - [E=HTTP_AUTHORIZATION:%{HTTP:Authorization}]

# Redirect to URI without front controller to prevent duplicate content
# (with and without `/index.php`). Only do this redirect on the initial
# rewrite by Apache and not on subsequent cycles. Otherwise we would get an
# endless redirect loop (request -> rewrite to front controller ->
# redirect -> request -> ...).
# So in case you get a "too many redirects" error or you always get redirected
# to the start page because your Apache does not expose the REDIRECT_STATUS
# environment variable, you have 2 choices:
# - disable this feature by commenting the following 2 lines or
# - use Apache >= 2.3.9 and replace all L flags by END flags and remove the
#   following RewriteCond (best solution)
RewriteCond %{ENV:REDIRECT_STATUS} ^$
RewriteRule ^index\.php(?:/(.*)|$) %{ENV:BASE}/$1 [R=301,L]

<IfModule mod_status.c>
    RewriteCond %{REQUEST_URI} ^/(fpm|server)-(info|status|ping)
    RewriteRule . - [L]
</IfModule>

# restrict access to dotfiles
RewriteCond %{REQUEST_FILENAME} -d [OR]
RewriteCond %{REQUEST_FILENAME} -l [OR]
RewriteCond %{REQUEST_FILENAME} -f
RewriteRule /\.|^\.(?!well-known/) - [F,L]

# ASSETS: check if request method is GET (because of WebDAV) and if the requested file (asset) exists on the filesystem, if both match, deliver the asset directly
RewriteCond %{REQUEST_METHOD} ^(GET|HEAD)
RewriteCond %{DOCUMENT_ROOT}/var/assets%{REQUEST_URI} -f
RewriteRule ^(.*)$ /var/assets%{REQUEST_URI} [PT,L]

# Thumbnails
RewriteCond %{REQUEST_URI} .*/(image|video)-thumb__[\d]+__.*
RewriteCond %{DOCUMENT_ROOT}/var/tmp/thumbnails%{REQUEST_URI} -f
RewriteRule ^(.*)$ /var/tmp/thumbnails%{REQUEST_URI} [PT,L]

# static pages
SetEnvIf Request_URI ^(.*)$ STATIC_PAGE_URI=$1
SetEnvIf Request_URI / STATIC_PAGE_URI=/%home

RewriteCond %{REQUEST_METHOD} ^(GET|HEAD)
RewriteCond %{QUERY_STRING}   !(pimcore_editmode=true|pimcore_preview|pimcore_version)
RewriteCond %{DOCUMENT_ROOT}/var/tmp/pages%{STATIC_PAGE_URI}.html -f
RewriteRule ^(.*)$ /var/tmp/pages%{STATIC_PAGE_URI}.html [PT,L]

# cache-buster rule for scripts & stylesheets embedded using view helpers
RewriteRule ^cache-buster\-[\d]+/(.*) $1 [PT,L]

# If the requested filename exists, simply serve it.
# We only want to let Apache serve files and not directories.
RewriteCond %{REQUEST_FILENAME} -f
RewriteRule ^ - [L]

# Rewrite all other queries to the front controller.
RewriteRule ^ %{ENV:BASE}/index.php [L]
Optional performance optimisations within the .htaccess file
<IfModule mod_deflate.c>
    # Force compression for mangled headers.
    # http://developer.yahoo.com/blogs/ydn/posts/2010/12/pushing-beyond-gzipping
    <IfModule mod_setenvif.c>
        <IfModule mod_headers.c>
            SetEnvIfNoCase ^(Accept-EncodXng|X-cept-Encoding|X{15}|~{15}|-{15})$ ^((gzip|deflate)\s*,?\s*)+|[X~-]{4,13}$ HAVE_Accept-Encoding
            RequestHeader append Accept-Encoding "gzip,deflate" env=HAVE_Accept-Encoding
        </IfModule>
    </IfModule>

    # Compress all output labeled with one of the following MIME-types
    # (for Apache versions below 2.3.7, you don't need to enable `mod_filter`
    #  and can remove the `<IfModule mod_filter.c>` and `</IfModule>` lines
    #  as `AddOutputFilterByType` is still in the core directives).
    <IfModule mod_filter.c>
        AddOutputFilterByType DEFLATE application/atom+xml application/javascript application/json \
            application/vnd.ms-fontobject application/x-font-ttf application/rss+xml \
            application/x-web-app-manifest+json application/xhtml+xml \
            application/xml font/opentype image/svg+xml image/x-icon \
            text/css text/html text/plain text/x-component text/xml text/javascript
    </IfModule>
</IfModule>

<IfModule mod_expires.c>
    ExpiresActive on
    ExpiresDefault "access plus 31536000 seconds"

    # specific overrides
    #ExpiresByType text/css "access plus 1 year"
</IfModule>

<IfModule pagespeed_module>
    # pimcore mod_pagespeed integration
    # pimcore automatically disables mod_pagespeed in the following situations: debug-mode on, /admin, preview, editmode, ...
    # if you want to disable pagespeed for specific actions in pimcore you can use $this->disableBrowserCache() in your action
    RewriteCond %{REQUEST_URI} ^/(mod_)?pagespeed_(statistics|message|console|beacon|admin|global_admin)
    RewriteRule . - [L]

    ModPagespeed Off
    AddOutputFilterByType MOD_PAGESPEED_OUTPUT_FILTER text/html
    ModPagespeedModifyCachingHeaders off
    ModPagespeedRewriteLevel PassThrough
    # low risk filters
    ModPagespeedEnableFilters remove_comments,recompress_images
    # low and moderate filters, recommended filters, but can cause problems
    ModPagespeedEnableFilters lazyload_images,extend_cache_images,inline_preview_images,sprite_images
    ModPagespeedEnableFilters combine_css,rewrite_css,move_css_to_head,flatten_css_imports,extend_cache_css,prioritize_critical_css
    ModPagespeedEnableFilters extend_cache_scripts,combine_javascript,canonicalize_javascript_libraries,rewrite_javascript
    # high risk
    #ModPagespeedEnableFilters defer_javascript,local_storage_cache
</IfModule>
Further performance adjustments
For more tips on optimising performance under Pimcore 10.5, see this article.
If you have any questions or need support, please feel free to contact our service department by e-mail support@maxcluster.de or by phone +49 5251 41 41 30.